Tooltester is supported by readers like yourself. We may earn an affiliate commission when you purchase through our links, which enables us to offer our research for free.
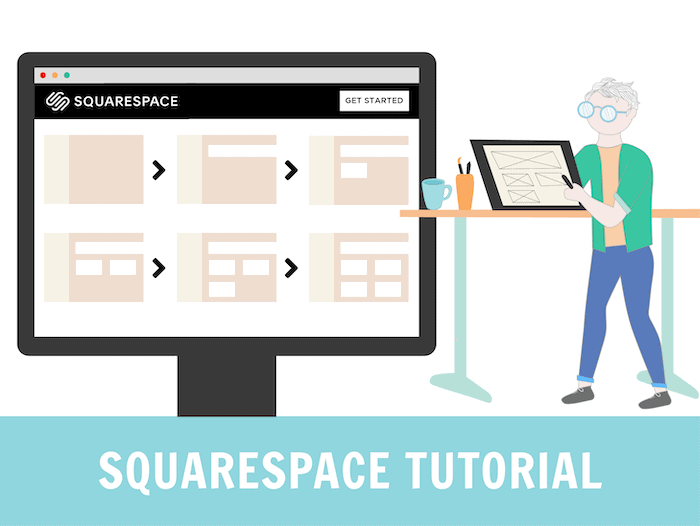
If you need to build an eye-catching website for your portfolio, blog, or online store, it’s hard to go past Squarespace. With its long-standing reputation as the website builder for designers, artists and creatives, Squarespace’s sleek templates are behind some of the web’s most visually striking websites (see examples of real Squarespace users here).
So, how easy is it to build a website with Squarespace? As we’ll show you in this Squarespace tutorial, creating a stunning Squarespace website can be relatively quick, easy and fun – as long as you have a few tricks up your sleeve.
Ready to get started? Let’s jump right in!
Who is this Squarespace Tutorial for?
This Squarespace tutorial is ideal if:
- You’re new to Squarespace (or website builders in general), and need a step-by-step walkthrough on how to use it
- You’d prefer to have a low-maintenance site that’s quick to set up, and don’t mind giving up some control over design to get this (otherwise, Webflow might be a better option to check out)
- You have a decent selection of high-resolution images to work with (either your own or stock images – you can license images from Getty Images directly through Squarespace)
- Your website will be on the smaller side (for example, a personal or business website that won’t have a huge amount of content)
- You’d like to add a portfolio or a blog to your site (we’ll take you through how to do this)
This tutorial will show you how to open a Squarespace account and build a relatively simple website.
It’s also a good starting point if you want to add more complex features (e.g. a membership area or online store). To find out how to add these features to your site, I’d recommend checking out Squarespace’s Knowledgebase.
Step-by-Step Squarespace Tutorial
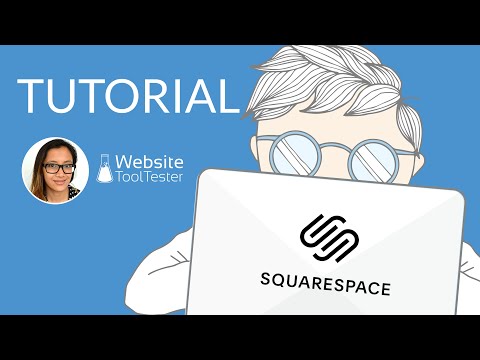
Our video provides a detailed demo of how to set up a Squarespace site. You can also follow our step-by-step guide below:
Try Squarespace for free here.
Step 1 – Choose your template
In our tutorial, we’re going to be building a portfolio site for a (fictional) graphic designer named Elli, to promote and showcase her services.
The first step is to browse through the different templates available, which you can find here. You’ll find over 100 to choose from, and can also browse by category (Portfolio, Photography, Blog etc). Hover over a template and you’ll see two options: 1) Start building your site using that template, and 2) Preview that template.
As it’s not possible to switch templates using the latest version of Squarespace, I’d recommend clicking the second option and previewing the template fully before deciding on one.
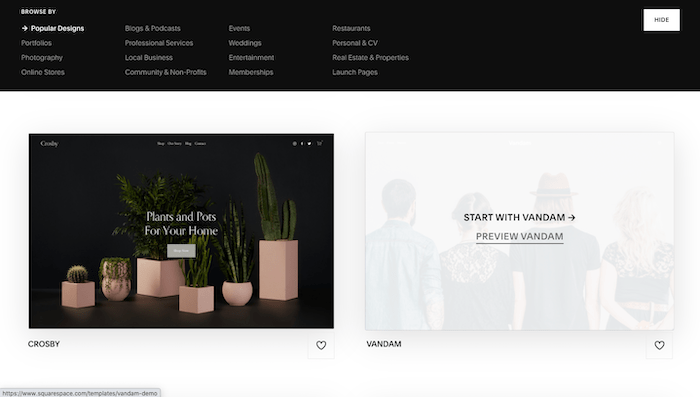
I’d recommend choosing a template that’s aesthetically in line with the site you want to have – e.g. similar fonts, colors, imagery. Layouts are fairly easy to change with Squarespace – changing styling however takes a little more work.
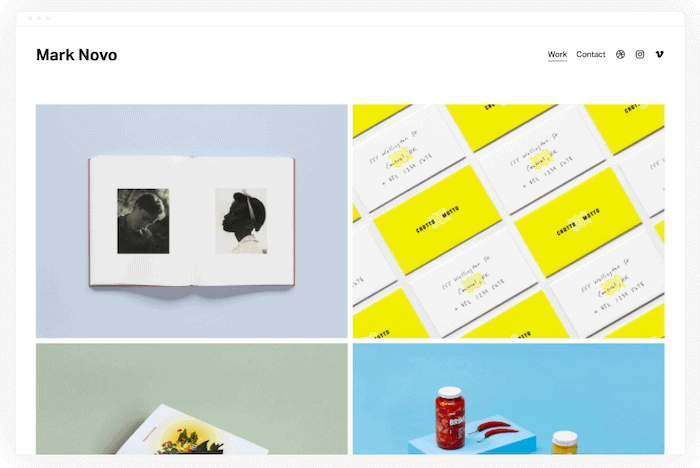
Once you’re settled on a template, click on the ‘Start with’ option. For Elli’s site, we’re going to choose the ‘Novo’ template under ‘Portfolios’, as it has a similar structure and aesthetic to what we want to feature.
Step 2 – Sign up for a Squarespace account (for free!)
The next screen will prompt you to sign up for Squarespace, using either your Google, Apple or email account.
There’s no credit card required, and you can actually try Squarespace out for free for 14 days (giving you plenty of time to decide whether or not it’s right for you).
While you can build a site for free within the 14-day trial period, you’ll need to upgrade to one of Squarespace’s plans to actually publish your site. We’ll cover that in the last step of this tutorial.
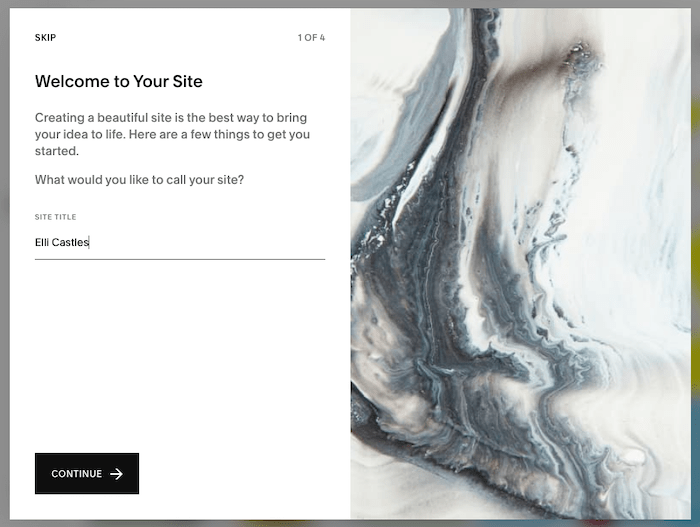
After providing your details, you’ll be asked what you’d like to name your site. You can enter a name here, or simply skip this step and revisit it later.
There will also be a few quick animations on how to make changes to your site, such as editing, creating and styling pages, which you can view or skip.
Step 3 – Get to know Squarespace
You’ll then be taken to this next screen, where you can start making changes to your site. Here’s a quick summary of the different sections of the screen:
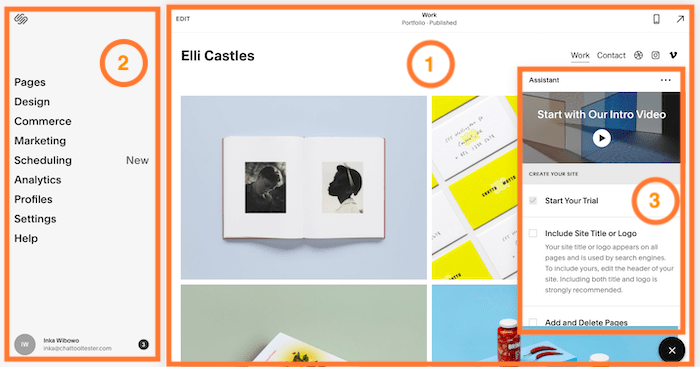
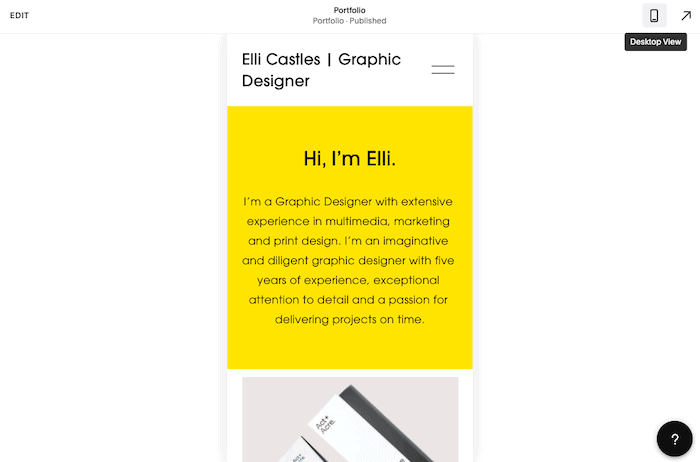
1. This first section is the Site Preview. It lets you preview the content and site styles of each of your site’s pages – text, images, sections, and more. Clicking the ‘Edit’ link in the top left will take you directly to your Editor, and it’s here where you’ll be making the bulk of your site’s changes. Right now, you’re taking a look at your site’s homepage. You can navigate to other pages by clicking on the links within this view (just as you would if you were viewing a live website).
2. If the first section takes care of page-level changes, you can think of the Home Menu on the left as taking care of ‘the bigger picture’. That includes your site’s design, pages and navigation menu, SEO, and analytics. It’s also where you manage any additional features (online store, member pages, blog etc). You can also navigate to your site’s pages by clicking on the ‘Pages’ option in this menu.
3. This Assistant provides a handy intro video to Squarespace (which I recommend checking out), as well as taking you through the steps of editing your site. As we’ll be covering them in this tutorial, you can close this window by clicking the X button on the bottom right (after you’ve watched the video).
Feel free to click around and explore these different sections, to get an idea of how it all works.
The main things to remember about Squarespace’s Editor are:
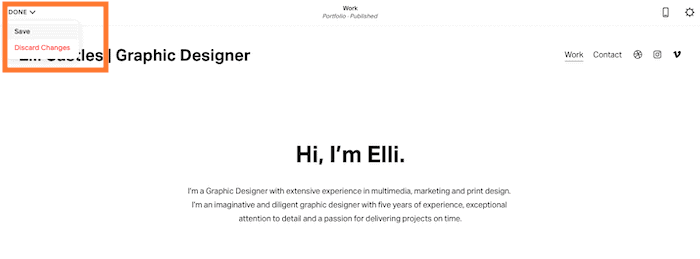
- Unfortunately, there is no autosave feature. You need to manually save changes after you’ve made them. This can be done by hovering over ‘Done’ in the top left, and choosing the ‘Save’ option.
- Likewise, there is no undo button (although you can undo text changes by using your standard keyboard shortcuts, e.g. CTRL/CMD + Z). You can choose to ‘Discard Changes’ (also accessed by hovering over ‘Done’ in the top left), but this will undo all the changes made since your last save (with no option to redo) – which is why it’s important to save your work regularly
Step 4 – Edit the header of your homepage
Let’s start making changes to our homepage by clicking the ‘Edit’ link, at the top left of your Site Preview (section 1).
We’re first going to focus on making changes to the content of the site (text, images etc). We’ll save design changes for later.
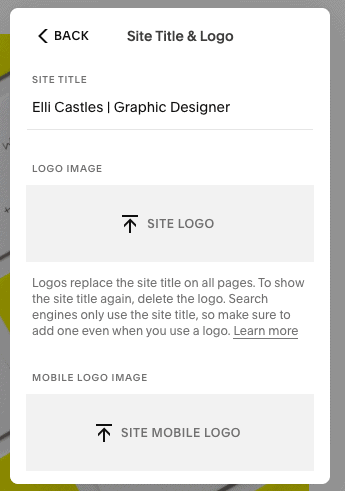
As you can see, Squarespace has automatically inserted the site name you provided earlier into the header of your website. If you’d like to change this, simply hover over the header, and click the ‘Edit site header’ button that appears.
You’ll see a new window popup. Choose the ‘Site Title & Logo’ option, where you’ll be able to change the site title, or even upload your own logo. Squarespace offers a free logo maker, by the way.
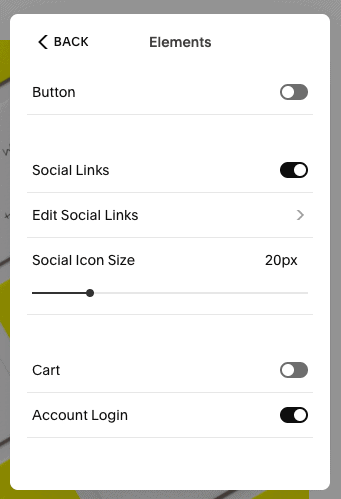
Once done, click ‘Back’ in the same window. You can also edit other elements of your header, including elements displayed in the main navigation (your site’s menu, visible in the top right of this template). For example, if you click ‘Elements’, you’ll be able to choose which elements you want to display in your main navigation (e.g. social links, call-to-action buttons, shopping cart or account login) by toggling ‘on’ or ‘off’.
In Elli’s case, we’re going to remove the Vimeo and Instagram links, so to do that, choose ‘Edit social links’, then click on one of the links you want to remove. A new popup will appear – click ‘Remove’.
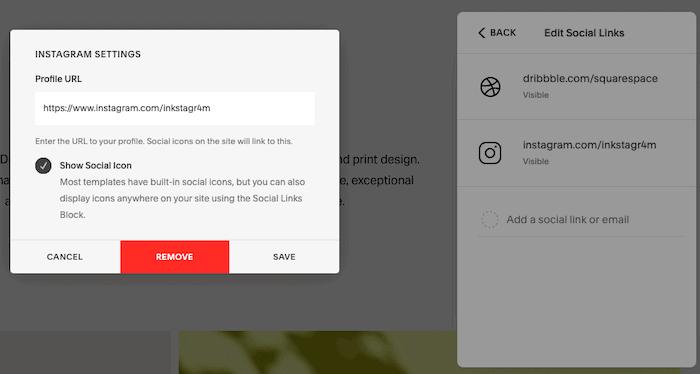
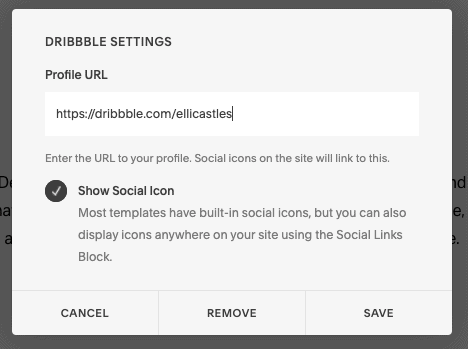
We want to keep the Dribble link but update it and add a link to Elli’s Dribble portfolio. So just select the Dribble option, then update the URL in the popup. Click ‘Save’ when done.
Any edits made to the header will apply to the header displayed throughout the whole site – not just the homepage. So, you’ll only ever have one version of the header on your site. You’ll also notice that the footer will automatically get updated with the social media links you’ve edited in your header.
Step 5 – Add a new section to your homepage
While Elli likes the overall structure of her homepage, she does want to make a few changes to the layout. Specifically, she wants to add a text introduction to the top of the page, to display above the existing gallery of images (which we’ll be editing a little later).
To do that, we’re going to hover over where we want to add this new section. A new button, ‘Add section’ will appear – go ahead and click that.

This is where one of Squarespace’s strongest suits comes into play. You’ll be able to choose from dozens of prebuilt layouts, ranging from headlines, lists and galleries, to more advanced functionality such as contact forms, newsletter signups, and appointment bookings to add your own content.
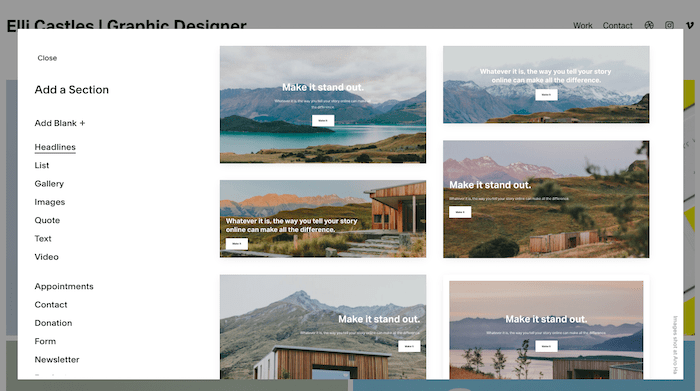
We just want to add a little bit of introductory text, so we’re going to choose from one of the layouts in the ‘Text’ section.
Don’t like the section you’ve just added? Don’t worry – all you need to do is hover over it, and then click the trash can icon that appears in the top right.
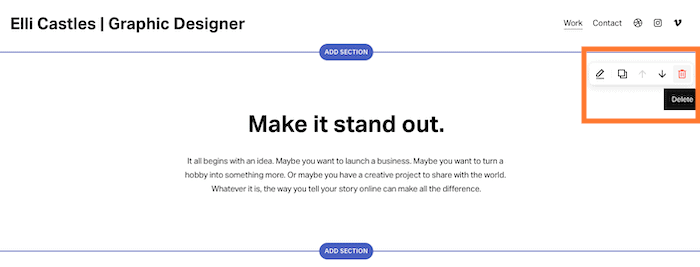
Otherwise, if you’re happy to keep it, click on the text and make your edits as needed to make it your own content. Once done, remember to hit the ‘Save’ button by hovering over ‘Done’ in the top left of the editor.
Step 6 – Edit existing ‘Projects’ section
Let’s move on to editing the next section of the page – the gallery of portfolio images (Squarespace calls these ‘Projects’).
We want to replace these with images of Elli’s own work, so let’s hover over the section and click the ‘Manage projects’ button that appears.

Note that you can also edit the appearance of this section – for example, if you want to display 3 columns of images instead of 2. Just hover over the section, click on the pencil icon that appears (‘Edit Section’), and adjust as needed.
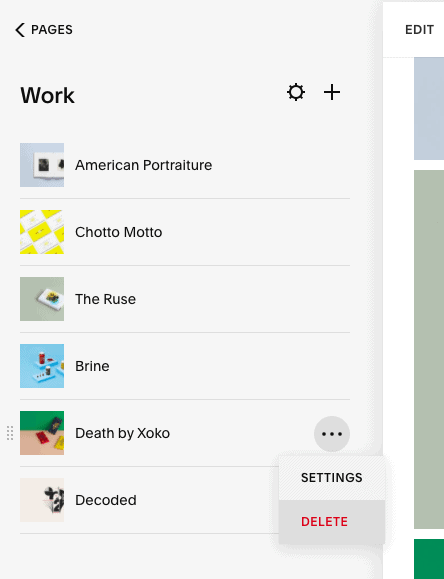
In the Home Menu on the left, you’ll see a list of the existing projects on the page. We’re going to delete a few of them as Elli only has four projects she wants to showcase – so hover over one of the projects, then click the ellipsis (‘…’) that appears. Click ‘Delete’.
To add (rather than delete) more projects, just click the ‘+’ icon that appears towards the top of this pane.
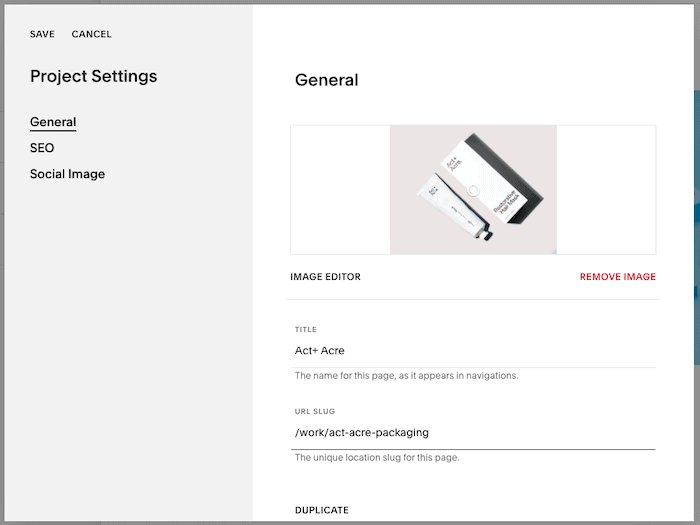
To change the images that appear in this section, hover once more over the relevant project, hit the ‘…’ icon, then click ‘Settings’.
In the new popup, click ‘Remove image’, and replace it with one of your own. Make sure to change the title and the URL slug (the page URL) too, to make it relevant to your site. Click ‘Save’ in the top left of the popup when done.
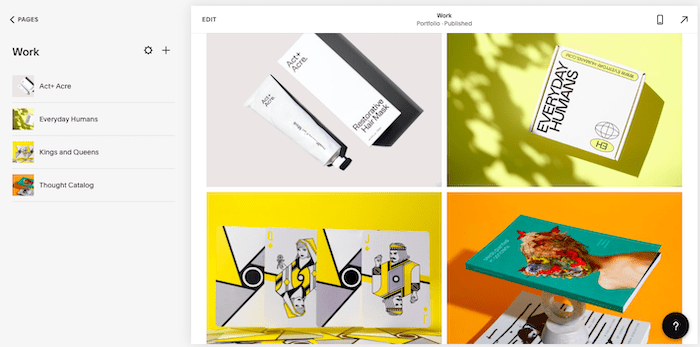
Repeat this for each of the other projects. Once done, you can check out how it all looks. If you’re happy with it, great – let’s move onto the next step.
Squarespace’s templates rely on high-quality, high-resolution images to work well. Without them, the design really starts to fall apart. It’s worth investing the extra work (or money, in the case of stock images) into making sure you have a good selection of these to use.
Step 7 – Edit ‘Projects’ pages
Each one of the images in your ‘Projects’ section leads to its own page, too. You can use this to include information about your project, or to add more images. To edit this page, simply click on the project in the Home Menu on the left, and then ‘Edit’.
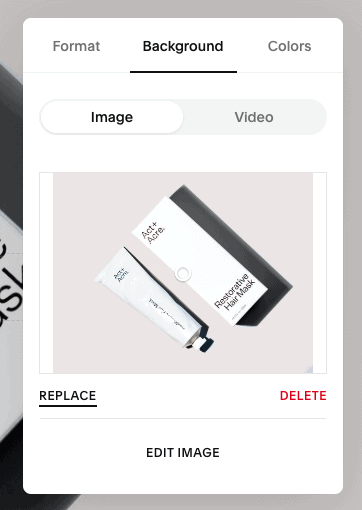
First, change the header background image by hovering over the section, then clicking the pencil icon that appears (‘Edit Section’). In the new popup window, select the ‘Background’ option and click ‘Replace’.
You can make edits to the rest of the page by clicking to edit, or by adding sections, as we’ve done previously.
To delete a section, hover over it, and click the trash icon that appears in the top right.

Once finished, click ‘Done’ then ‘Save’ in the top left, and repeat with the remaining ‘Projects’ pages.
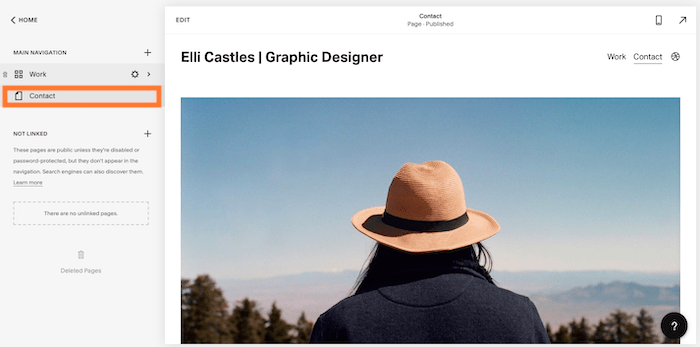
Step 8 – Edit ‘Contact’ page
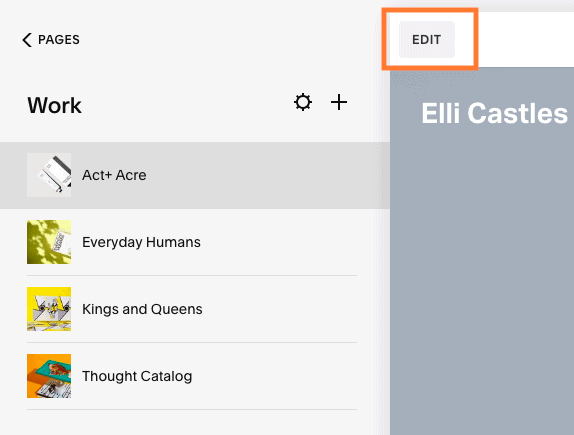
We’re happy with our homepage and our ‘Projects’ section, so let’s move on to editing another page. Our template has a ‘Contact’ page included, which we want to keep so that potential clients can get in touch with Elli. To edit that, click on the ‘Pages’ link in the top left of the Home Menu.
Then, click on the ‘Contact’ page (highlighted below). The ‘Contact’ page will appear in the Site Preview on the right, so click ‘Edit’ to start making changes to it.
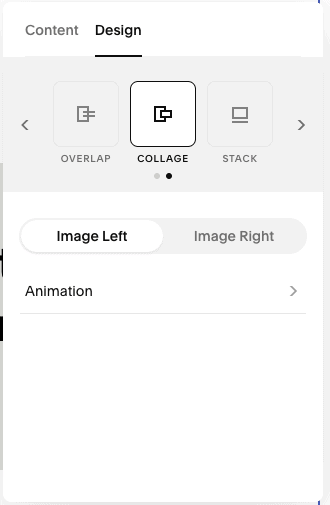
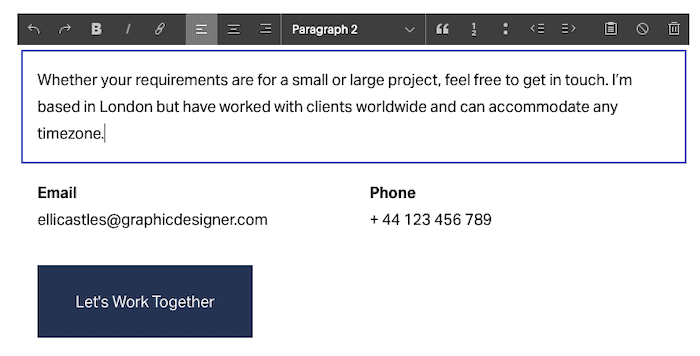
First, we’re going to replace the main image with one of Elli. To give it some design flair, we’re also going to change the image format so a text box overlaps it. To that, click on the image, and then the pencil icon to edit. After replacing the image, select the ‘Design’ tab, then choose the ‘Collage’ option.
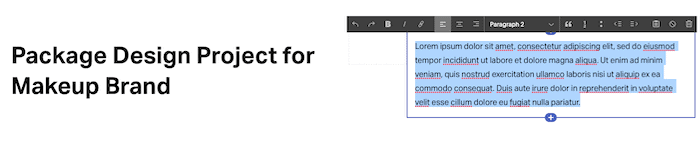
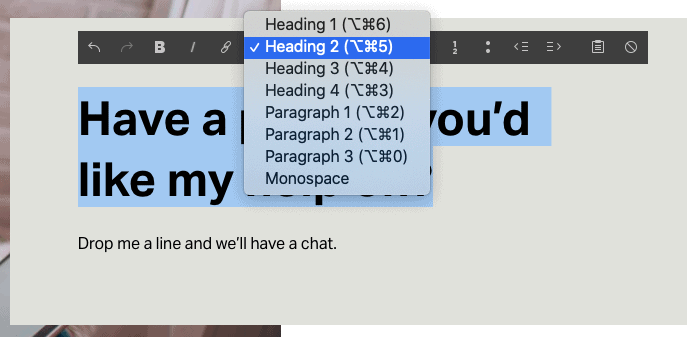
Click in the text area to edit the text. You can also change font sizes by highlighting the text and selecting a different text type (e.g. Heading 1, 2 etc).
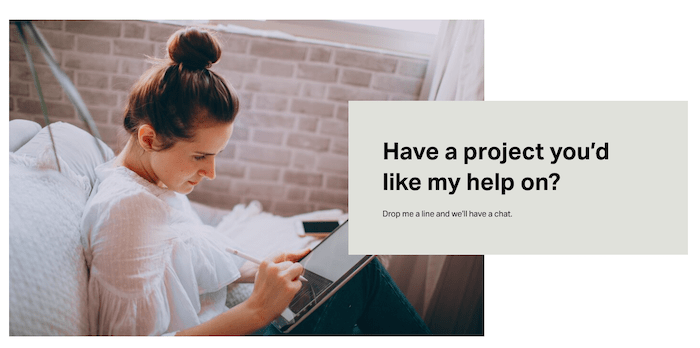
Once finished, you’ll have something that looks like this:
We’re then going to change the existing text, as we’ve done in previous steps, by clicking and editing. You can also change text formatting (e.g. bold or italic styling) by using the toolbar that appears above the text.
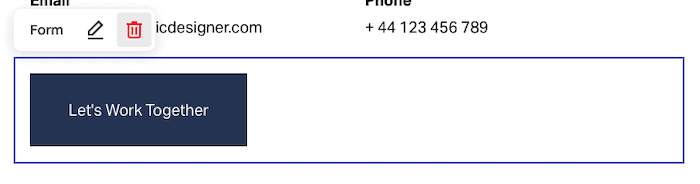
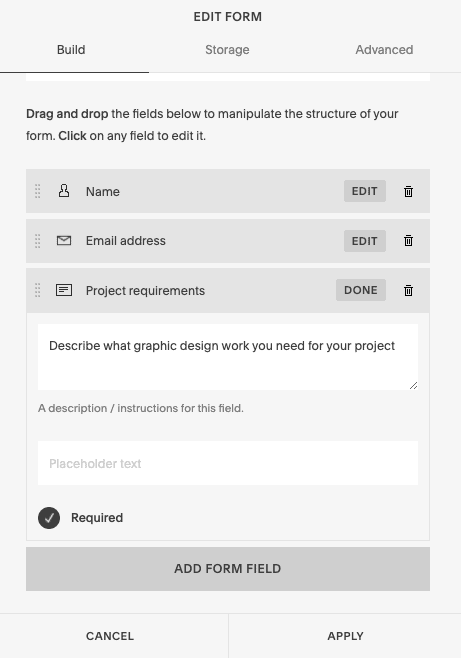
Finally, we want to replace the existing ‘Let’s Work Together’ button with a new contact form. So delete this by clicking on it, then clicking the trash icon.
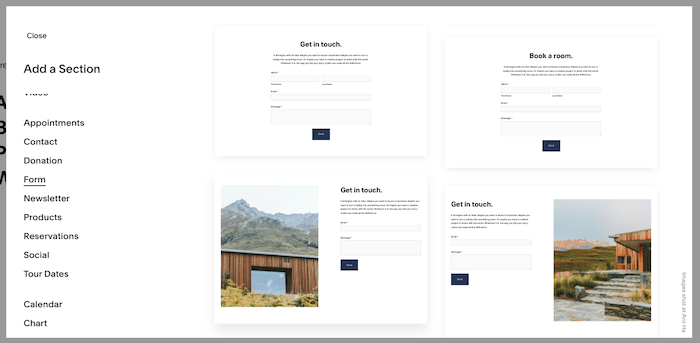
We’ll then add a new section (as we did previously in Step 6). Hover over to where you want to add the form (in our case, at the bottom of the page), click ‘Add section’, then select the ‘Form’ option. You’ll see a selection of different form layouts to choose from – we’re going to scroll down, and choose one that displays an image next to the form.
Once your form is inserted, change the image (you’ll know how to do this pretty well by now!), and edit the text above the form as needed.
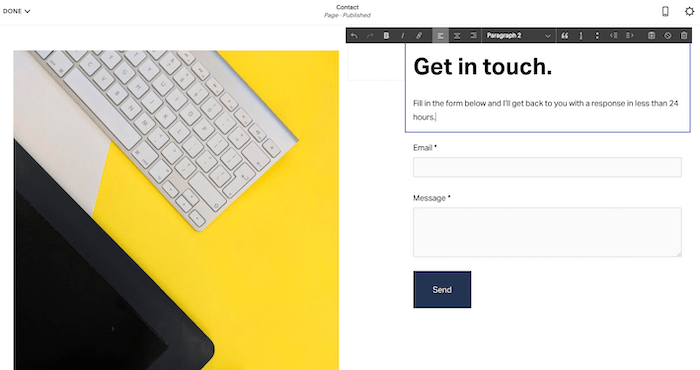
To make changes to the form fields, click on the form and select the pencil icon to edit. You can edit/remove existing fields, and add new ones.
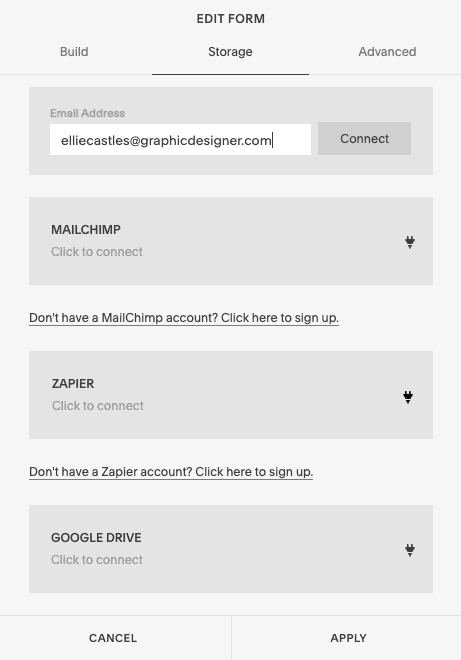
Next, you’ll need to define where the data from any form submissions will go. Click the ‘Storage’ tab – you’ll be able to choose to receive them as email updates, or for the data to go directly to a Google Drive spreadsheet, Mailchimp, or any other email marketing tool (using Zapier). In our case, we’ll just be choosing the email option.
Once done, click the ‘Apply’ button. Check that everything on your page looks okay. If you’re happy with it, let’s move onto the next step – adding a blog.
Step 9 – Adding a blog
You’ve seen how to edit existing pages in a Squarespace template. But what if you want to add a new page? Or a set of pages (for example, a blog)?
It’s actually easier than you might think. In the Home Menu on the left, make sure you’re in the ‘Main Navigation’ menu (if you’re not already there, you can access it by clicking on ‘Pages’). Click the ‘+’ button that appears next to ‘Main Navigation’ (or, if you don’t want this new page to be accessible from your site’s main navigation, click the ‘+’ that appears next to ‘Not Linked’).
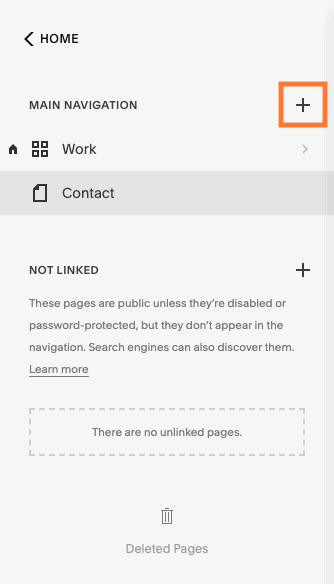
Although you’ll probably want most pages to be linked to from the main navigation, instances where you might want to use the ‘Not linked’ option include password-protected pages, members-only areas, and ad-driven landing pages – basically, anything that you wouldn’t want a regular visitor to see.
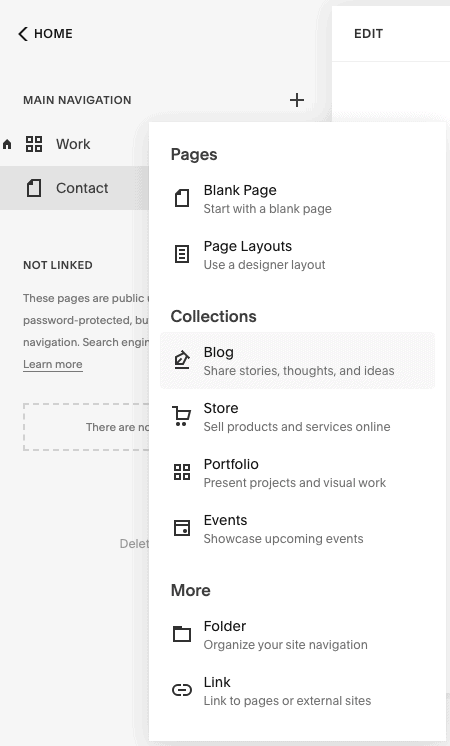
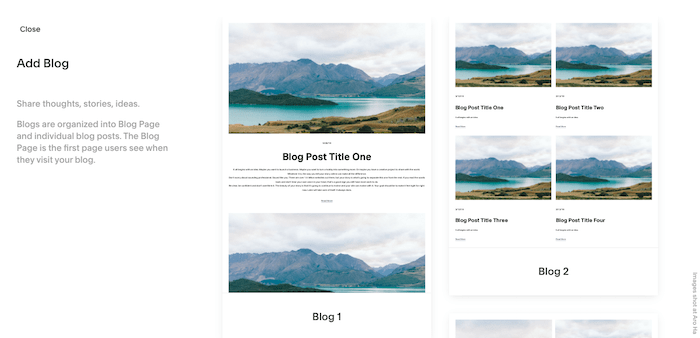
You’ll see various options for adding a new page, including the option to add a blank page, or start with a layout/template. We’re going to choose the ‘Blog’ option.
Next, select the blog layout you want to use (we’ll be choosing ‘Blog 2’):
Once it’s been added, you can edit the menu title for the blog in the left pane. This will be the title that appears in your site’s menu/main navigation, so to keep it short and sweet, we’re just going to name it ‘Blog’.

Next, click on the ‘Blog’ menu item you’ve just edited, and you’ll be taken to a list of the demo blog posts that come with the template.
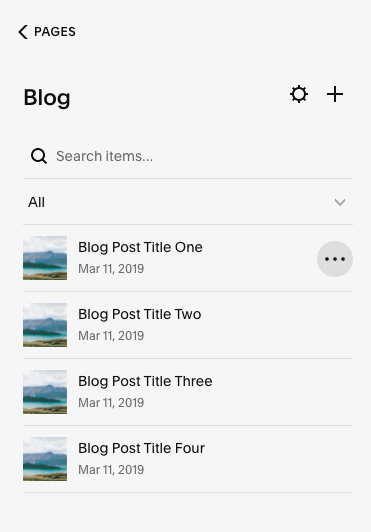
These can be edited in the same way as you previously edited your ‘Projects’. Click on the ‘…’ that appears next to each blog title to either delete or duplicate the blog post.
Likewise, you can click on ‘…’ and choose ‘Settings’ to:
- Change the status of the post (e.g. ‘Draft’, ‘Needs Review’, ‘Publish’ or even ‘Schedule’ posts)
- Add tags and categories
- Enable/disable commenting
- Change the main image of the blog (under the ‘Options’ menu item)
- Edit SEO settings (title, description and URL)
- Add links to social media or email campaigns
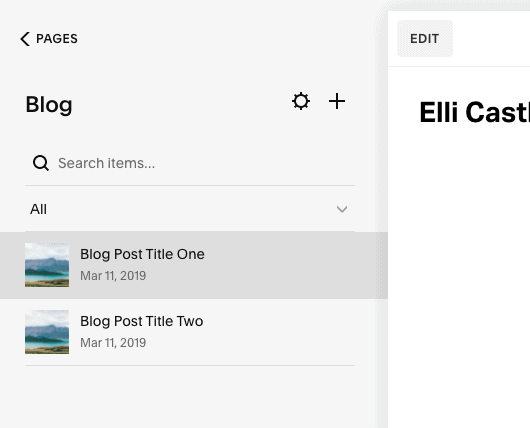
To edit the content of the blog posts, simply click on the blog title in the left, then click on ‘Edit’ in the editor section.
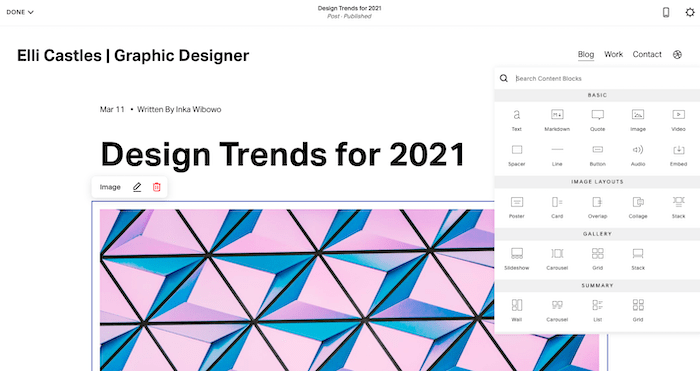
As with the ‘Project’ pages, you’ll be able to edit existing headings, images, text, and add/remove sections.
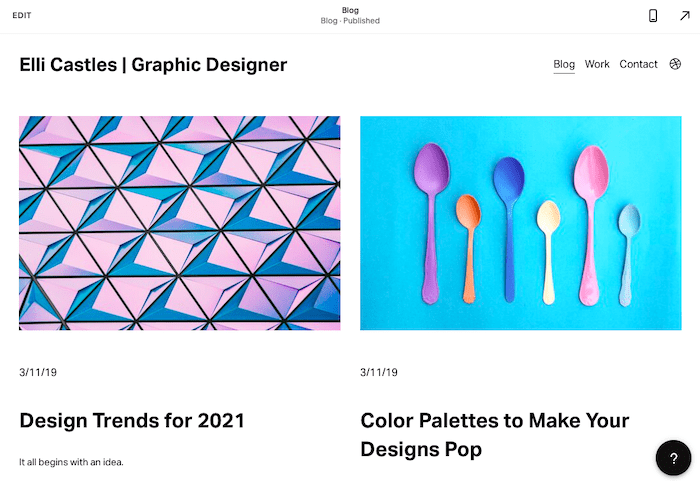
Once done, you’ll end up with a main blog page that might look a little this – pretty cool, huh?
Step 10 – Customize your site styles
We’ve taken care of the content of the site. Now, let’s make sure the design and styling is exactly as we want it.
Squarespace’s templates have a unified design throughout the whole site – each page uses the same site styles, color scheme, fonts etc. This helps Squarespace sites maintain the high-design aesthetic they’re renowned for.
You can make small adjustments to the templates by following these next steps. It’s best not to stray too far from the original design – however, you can inject a little bit of your/your business’s personality into it.
It is possible to add custom code (HTML, CSS and JavaScript) if you want to make bigger changes. I wouldn’t really recommend this as a) Squarespace’s templates are superb as they are and b) Squarespace won’t provide support around these changes, but the option is there.
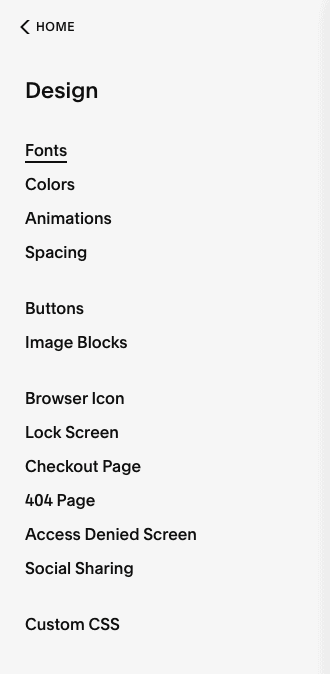
First, hit the ‘Home’ option in the left pane to navigate back to your Home Menu. Then, choose ‘Design’. You’ll find a whole range of options for customizing your site – fonts, colors, animations, buttons, and more.
Customizing fonts
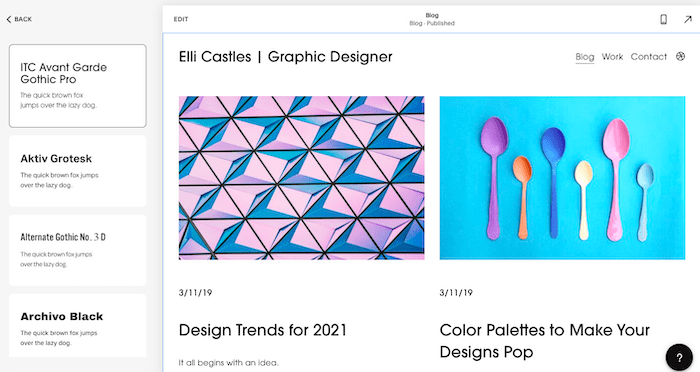
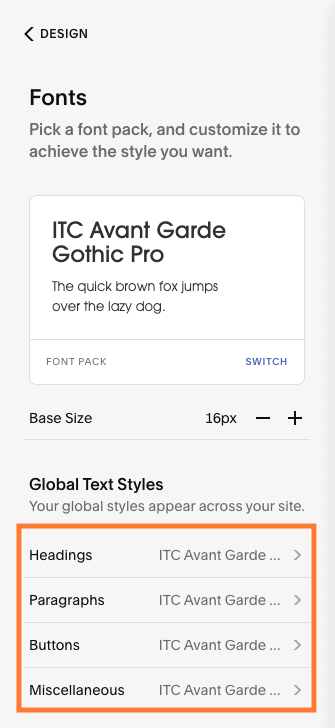
Let’s start by clicking on ‘Fonts’. Squarespace uses font packs – pairs of fonts that are matched to best fit with your template. You can switch between font packs, change the fonts within packs, and even make adjustments to height, weight, and spacing. So, choose the font pack that works best for your site by clicking on the ‘Switch’ option.

We’re going to choose the font pack ‘ITC Avant Garde Gothic Pro’ – you can click on it and preview how it’s going to look in the editor on the right (all headings and text will be automatically updated with the new font pack).
To make adjustments to your font pack (e.g. fonts, height, spacing etc), hit ‘Back’, and click on one of the ‘Global Text Styles’ options as highlighted below. Below these you’ll also find the ‘Assign Styles’ option, which will let you specify where each text style should be used on your site.
Customizing colors
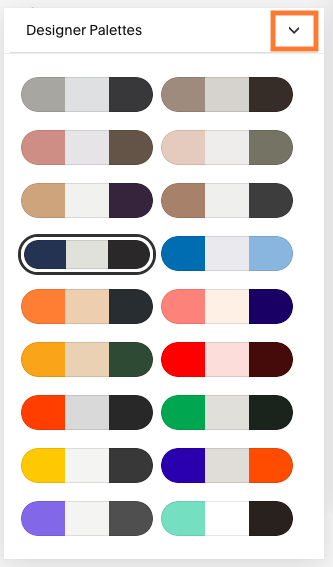
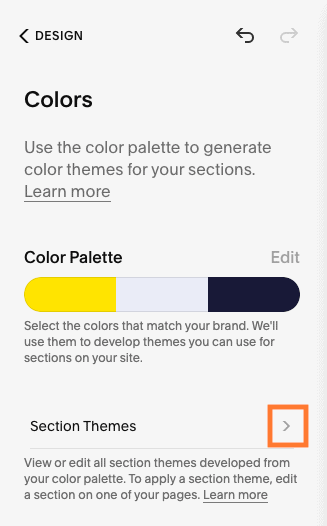
Maybe your business’s branding has some colors that you’d like reflected in your site’s design. Or maybe you prefer bold and bright colors to the template’s minimalistic color scheme. If this is the case, you can adjust your site’s theme by navigating back to the ‘Design’ menu in the left pane, and selecting the ‘Colors’ option.
Next, click on ‘Edit’, which appears above the color palette. You can choose from one of Squarespace’s existing color palettes. To choose custom colors, or even select colors from an uploaded image, click the chevron/arrow icon (highlighted below).
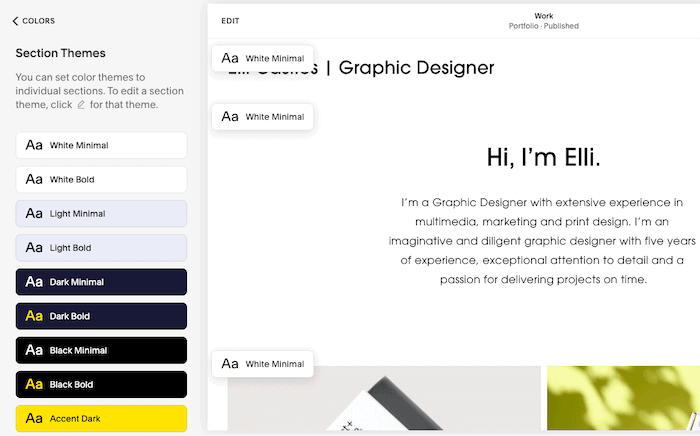
To start applying these colors to your site, click the chevron next to ‘Section Themes’:
You’ll find a list of auto-generated color themes that you can start applying to your site (these will change background, text, link, button colors etc). You can choose to leave them as they are, or customize them by clicking on the pencil icon that appears when you hover over a theme.
In the Site Preview window on the right, you’ll also see the color themes applied to each section of the page you’re viewing. As you can see, we’re using ‘White Minimal’ throughout the homepage.
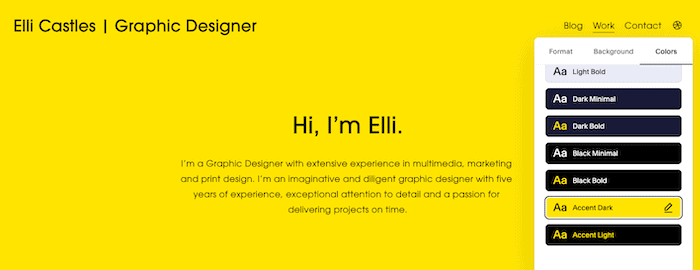
Color themes can only be changed on a section-by-section basis. By default, the header will inherit the color theme of the first section on that page, although you can change this by selecting ‘Edit site header’ > ‘Colors’ > toggling the ‘Transparent’ switch. Color themes applied to the footer will apply to the whole site.
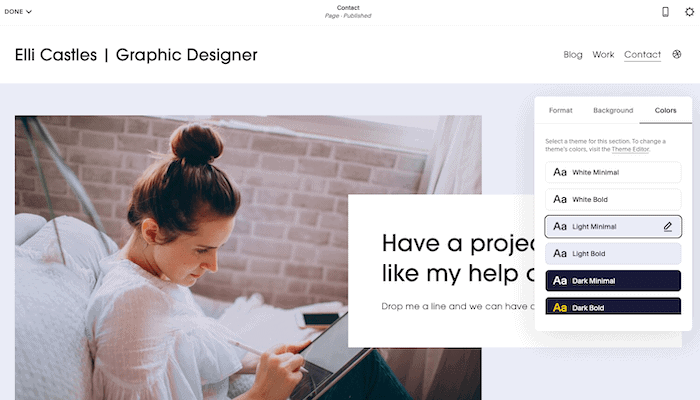
To start making changes, click on ‘Edit’ in the Site Preview, then hover over the section you want to update, selecting the pencil icon. Then, in the popup window, navigate to the ‘Colors’ tab, and choose your preferred theme (we’re going to go with ‘Accent Dark’ for the top section).
Browse to other pages of your site and repeat if you’d like to make further changes:
Once you’re finished, click ‘Done’ in the top left, then ‘Save changes’.
Of course, there are a ton of other design elements you can adjust, such as buttons, spacing, and so on. However, I think you’re pretty well-acquainted with the system by now, so if you’d like to make further changes, feel free to try it out yourself 🙂
Step 11 – Update page titles, navigation menu and SEO settings
We’re getting so close to the finish line! Let’s just take care of a few housekeeping items first.
We’ll start by making sure that each page:
- Displays pages in the order we want them in the navigation menu,
- Uses titles that are representative of each page, and
- Has the correct SEO settings.
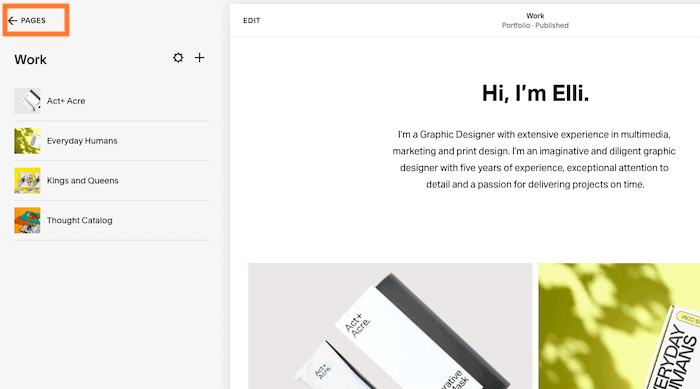
A. In the Home Menu, click ‘Pages’. Under the ‘Main Navigation’ menu, rearrange the pages as needed by dragging them in order. You’ll see changes reflected in the Site Preview on the right.
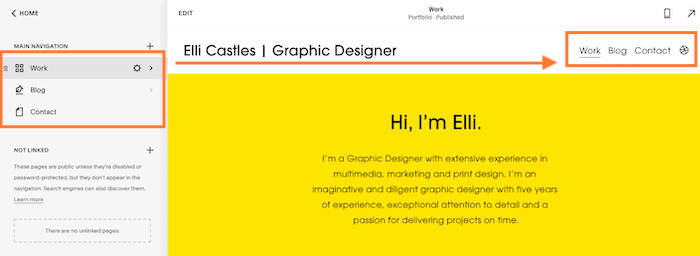
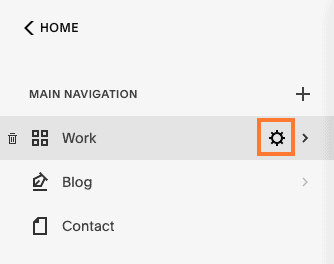
B. If there are any titles that you want to change, this is also where you do it. For example, we want to change ‘Work’ to ‘Portfolio’. In the Home Menu on the left, hover over the ‘Work’ page, then click the settings/gear icon that appears.
Update the ‘Page Title’ and ‘Navigation Title’ (plus the ‘URL slug’ if you’d like), then hit ‘Save’ in the top left.
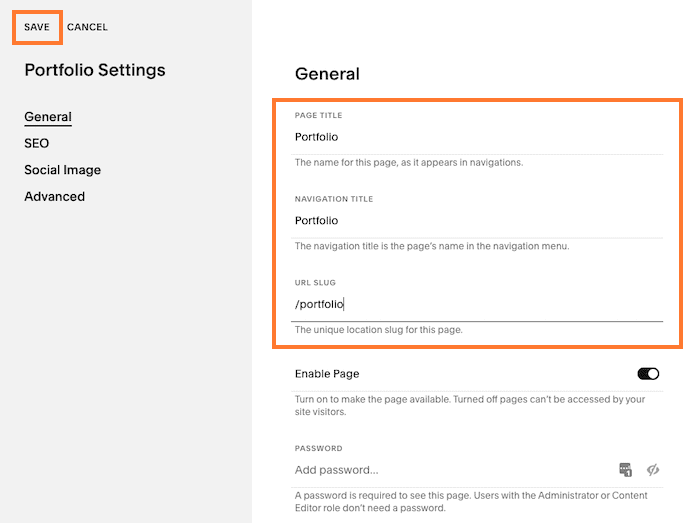
C. Now is also a good opportunity to update your SEO settings for each page, in case you’d like to target specific keywords on Google. Again, hit the settings/gear icon next to the page you want to edit, then navigate to the ‘SEO’ menu. Edit ‘SEO Title’ and ‘SEO Description’, and hit ‘Save’. I’d recommend repeating this for each page, including for your portfolio projects and blog posts.

For more tips on how to optimize your site for SEO, check out our Squarespace SEO guide.
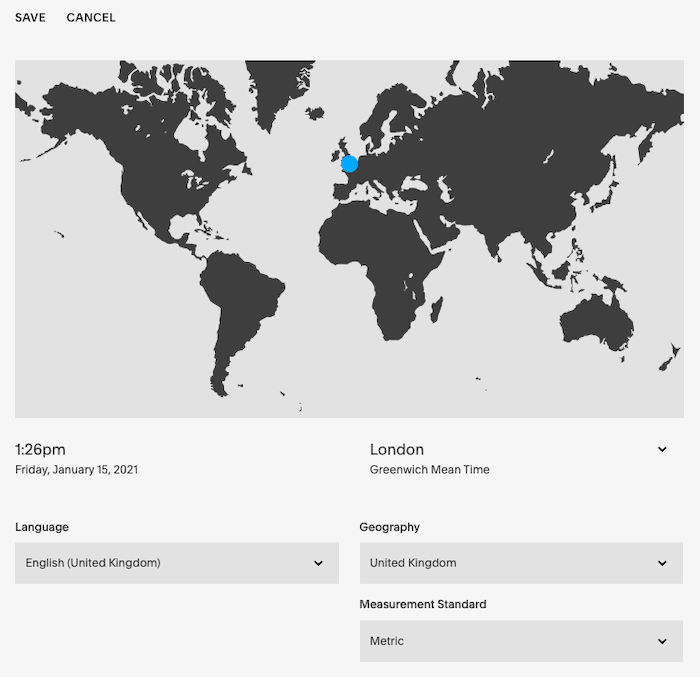
Next, let’s make sure we’ve got your site settings correctly set up. In the Home Menu, navigate to ‘Settings’, then choose ‘Language and Regions’.
Then, ensure you have the right timezone, region, language and measurement standard (this will be relevant if you’re selling products) selected. Click ‘Save’ when done.
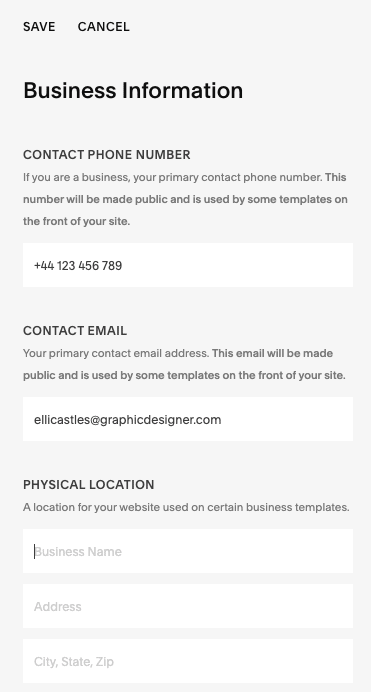
Back in the ‘Settings’ menu, select the ‘Business Information’ option, and enter all the relevant details. Depending on your template, some of these may automatically get inserted into your site. Again, hit ‘Save’ when finished.
Step 12 – Final check, domain set up, and launch!
Up until this point, your site is only visible to you. Now that we’ve updated our site’s content, design and SEO settings, it’s ready to share with the world – so let’s go ahead and publish it!
Although you’ve been using Squarespace’s free trial up until now, you’ll need to upgrade to a paid plan to publish your site – so make sure you’re 100% happy with your Squarespace site before you commit to doing this.
First, make sure you’re happy with how everything looks by checking each page in the Site Preview.
Be sure to also check out the mobile version of your site by clicking the mobile icon (all Squarespace sites will be mobile-optimized by default).
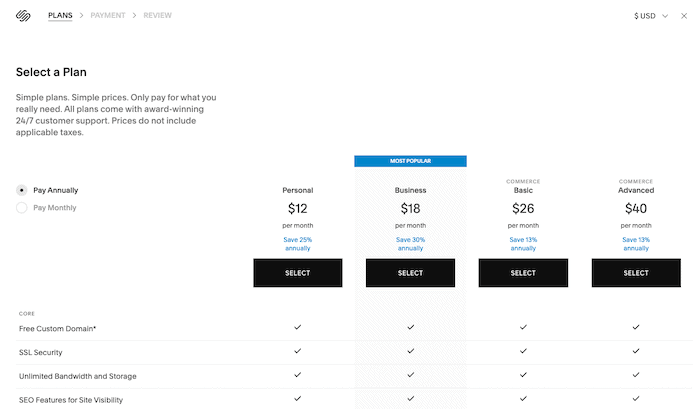
Next, you’ll need to upgrade to one of Squarespace’s paid plans. You can either hit the ‘Subscribe’ button displayed at the bottom of your screen (this is the easiest option!), or go back to the Main Menu, choose ‘Billing & Account’, then ‘Billing’, and ‘Upgrade your plan’.
You’ll then be able to select from one of Squarespace’s four plans, and to choose between a monthly or annual subscription. If you need help selecting the best plan for you, check out our Squarespace pricing guide.
Once you’ve provided your payment details, and clicked ‘Confirm and Purchase’, you can go ahead and publish your site! First, go back to the Home Menu, choose ‘Settings’, and ensure your ‘Site Availability’ is ‘Public’ (rather than ‘Private’).
Finally, it’s time to link your site to a custom domain name. Again, that’s done in the Home Menu on the left by selecting ‘Settings’, then ‘Domains’.

You’ll see three options:
- Get a domain name – choose this option if you don’t currently have a custom domain name and want to purchase one directly through Squarespace. Squarespace also offers a domain for free for the first year, if you purchase an annual Squarespace subscription
- Use a domain I own – choose this option if you have an existing domain with another provider (e.g. Namecheap, GoDaddy). You can either a) transfer it to Squarespace or b) connect it to your Squarespace site (in case you want to keep it with your existing provider)
- Built-in domain – this is an autogenerated domain assigned to you by Squarespace (which you can change). It will look something like this: yoursiteid.squarespace.com. This doesn’t replace your custom domain – you can think of it as an internal domain that only you can see
Choose the option that applies to you, and follow the steps involved.
And that’s it – you now have a published Squarespace site, ready to show off to the world! 🎉
Squarespace Tutorial: Conclusion
Squarespace offers one of the best website builders for building a portfolio or blog, and this tutorial has covered the steps for putting together a simple (yet stylish) Squarespace website that includes those features. But Squarespace holds its own in other categories too, such as ecommerce and member areas – you can find out more in our full Squarespace review.
Ready to give Squarespace a go? Try it out for free here.
Like Squarespace’s design focus, but craving more control? Webflow might be a better choice for you – read our Webflow vs Squarespace comparison here. You can also see how it stacks up against Wix in our Wix vs Squarespace comparison.
The author
Learn more about us
We keep our content up to date
20 May 2022 - Small updates and corrections
THE BEHIND THE SCENES OF THIS BLOG
This article has been written and researched following a precise methodology.
Our methodology