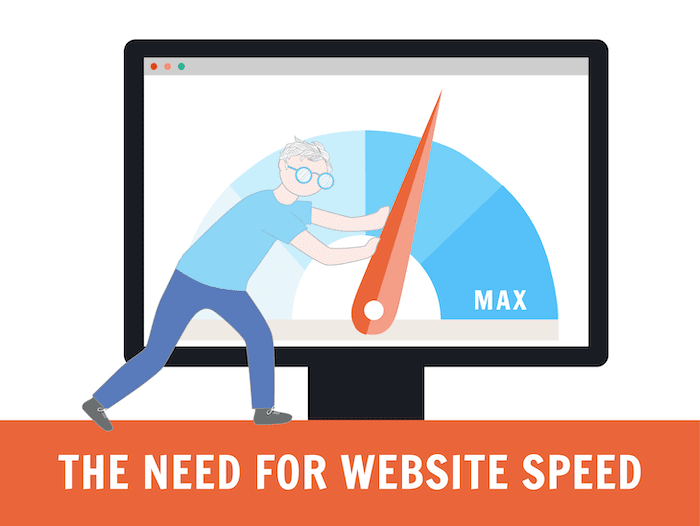
Nobody likes a slow website. Slow page load times will drive away potential visitors and can cause your website to rank lower in the search results.
All in all, this means less people coming to your website and a poor user experience for those that do.
Which is undoubtedly bad for business!
The good news is that there are a ton of things that you can do to speed up your website if you’re unhappy with its current performance.
Below, we have 13 actionable steps that you can start taking today to get the faster loading times you want.
But before you start, it’s essential that you benchmark exactly how slow your website is. This will give you a good idea of just how big the problem is, and enable you to measure how effective the fixes are.
Tools to help diagnose a slow website
There are a number of useful online tools that will help you measure exactly how slow your website is.
These tools are also really useful for identifying exactly what is slowing it down and suggesting what you can do to speed it up!
Here are two of my favorite website speed reporting tools:
Google Page Speed Insights
This free tool from Google will check any URL and run a test on your site for its performance. It provides different results for how your site works on both desktop and for mobile platforms.
It will cover many of the areas discussed in this article and give suggestions about what might specifically be causing your site to slow down.
However, this tool does seem to be very aggressive and sometimes unrealistic, so keep this in mind.
Pingdom Website Speed Test
Pingdom also has some great speed testing solutions, which can test your site from multiple locations around the globe (this is one of the reasons why it’s a good idea to use a CDN; more on this below).
It also provides many practical solutions for improving your speed.
13 ways to fix a slow website
1. Use a faster web hosting provider
In my experience, slow web hosting is probably the biggest contributing factor to a slow website. So, changing to a faster web hosting provider, will usually give you the biggest boost to your website’s speed.
Of course, changing providers is also the most significant and most expensive of the all steps on this list. So, by all means try the rest of the steps first: I’m sure you will see some speed gains.
But for me at least, the biggest speed gains have always come when I “bit the bullet” and upgraded my web hosting.
To choose the fastest web hosting provider, you can take the following steps:
- Determine your website needs: Identify the needs of your website, such as the amount of traffic it receives, the amount of storage space required, and the level of security needed.
- Compare hosting providers: Research and compare hosting providers based on your website needs. Consider factors such as uptime, page load speed, security features, and customer support.
- Consider server location: Choose a web hosting provider that has servers located close to your target audience. This can reduce latency and improve website speed.
- Check server resources: Make sure the hosting provider can handle the traffic on your website by checking the server resources, such as CPU and RAM.
2. Optimize your images
Unoptimized images are another one of the biggest contributors to a slow website. And luckily they are also one of the easiest things to fix.
By “unoptimized”, I mean images that have an unnecessarily large file size. That is: the number of kilobytes (KB) or even megabytes (MB), of each image file is larger than it needs to be.
Ideally, I try to keep every image on my website below 100 KB. This won’t always be possible, but it’s something to aim for.
There are 3 attributes that affect image file size (and these are what we should be optimizing):
- Image dimensions in pixels
- The image format (JPEG, PNG, GIF etc.)
- The amount of compression applied to that image
Optimizing image dimensions
The bigger the dimensions of an image, the bigger its file size. So, you want to make sure that the width and height of the images on your website are no bigger than they need to be.
This means that if we have a 2000 pixel wide image, that will ultimately be displayed on the website as 700 pixels wide, we need to edit the file so that it is 700 pixels wide before it’s displayed on the page.
This can be done before it’s uploaded to the website with programs such as Photoshop or GIMP, or through websites like Kraken.io, and Compressor.io. A lot of these websites also provide WordPress plugins which will resize the images after you’ve uploaded them to your website (if you’re using WordPress).
Choosing the optimal image format
Which format you serve your images in will also affect their file size, by applying different types of compression (see below). Different formats are more suited to different types of images.
JPEG is ideal for photographs, while PNG is suitable for images with transparent backgrounds or illustrations with sharp edges. GIF is only really used for animated images these days.
There are also newer image formats such as WebP that offer even better levels of compression. However, some browsers (e.g. Internet Explorer 11), still don’t support WebP, so we need to be careful how we use them.
There are services (see below) that can detect when next generation image formats are supported and automatically convert your images and serve them in this format for another extra speed boost!
Maximizing compression while maintaining image quality
All the popular image formats will compress your images to reduce the file size. You can usually choose the degree to which they are compressed, with the trade-off being that greater compression means poorer image quality.
So you need to find a balance where the image quality is acceptable, but the file size is not too big.
The same applications and websites that will resize the dimensions of your images will also compress the images. Tiny PNG is another. Often you can choose the level of compression you want, with previews letting you keep an eye on the quality.
3. Use lazy loading
Talking about images, there’s no need to load them if no one sees them, right? It’s just an unnecessary overhead.
Lazy loading is a technique used to improve website performance by loading images and videos only when they are needed.
This can significantly reduce the time it takes for a website to load, as only the content that is visible to the user is loaded.
To implement lazy loading, you can take the following steps:
- Identify which images and videos to lazy load: These may include images and videos that are below the fold or not immediately visible to the user.
- Install a lazy loading plugin or script: There are many plugins (see below) available for popular content management systems like WordPress that can help implement lazy loading easily. If you’re not able to use a plugin, it’s easy to add the code yourself.
- Configure the lazy loading: Configure the settings of the lazy loading plugin or script based on your website’s needs. This may include settings for which types of content to lazy load, the threshold for when to start loading images, and more.
- Test the lazy loading: Check that the images and videos are loading correctly and that there are no issues with website performance.
4. Enable caching
Enabling caching can significantly speed up a slow website by reducing the number of requests that the browser needs to make to the server to retrieve resources.
When a user visits a website for the first time, the browser downloads all the necessary files, such as HTML, CSS, JavaScript, and images. When the user revisits the website, the browser can retrieve these files from its cache instead of downloading them again, reducing page load times and improving the user experience.
To enable caching, you can take the following steps:
- Enable caching headers: Caching headers, such as “Expires” and “Cache-Control,” tell the browser how long to store static files in the cache. By setting these headers, you can control how long files are cached.
- Set expiration dates: Setting expiration dates for static files in the cache can help ensure that users download the latest version of the file when it is updated. This can be done by setting a “max-age” value in the caching header.
Again, if you’re using WordPress, then there are a number of caching plugins that will do all this for you (see below). Otherwise, it’s pretty easy to do the basics yourself, depending on what type of web server you use.
5. Use a content delivery network (CDN)
A content delivery network (CDN) can speed up a slow website considerably, by distributing your website’s content across a network of servers located in different geographic regions.
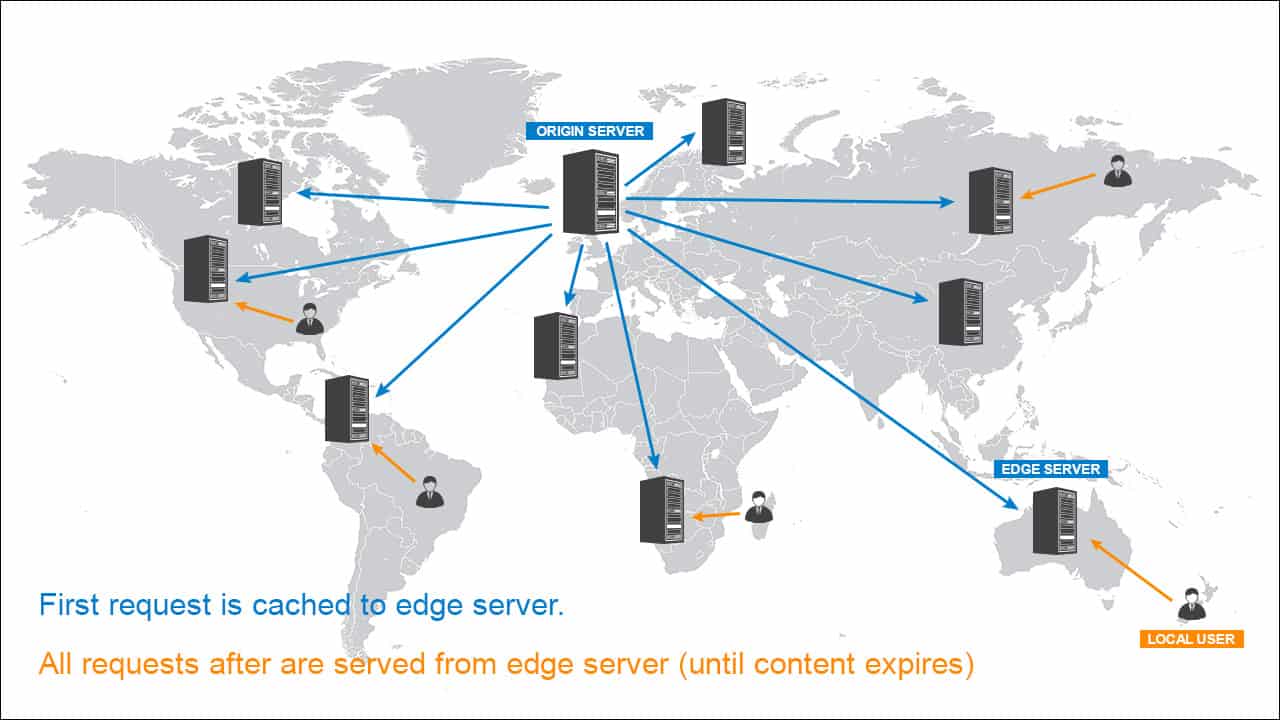
When a user requests your website’s content, the CDN serves it from the server that is closest to the user, reducing the distance the data has to travel and improving load times.
To use a CDN, you will need to take the following steps:
- Sign up for a CDN service: There are many CDN providers available, including Cloudflare, Amazon CloudFront, and Akamai. Choose a provider that offers the features you need and that fits within your budget.
- Configure the CDN: Once you have signed up for a CDN service, you will need to configure it to work with your website. Most CDN services have an easy, step-by-step guide to help you through the process
- Point your nameservers to the CDN: Finally, login to your domain registrar and change the nameservers so that they point to the CDN service rather than directly to your web host
6. Combine Files
Combining files will reduce the number of HTTP requests made by your website, which can make a big difference to its load times.
This is because every time a web page is loaded, the browser sends multiple requests to the server to retrieve all the necessary resources, including HTML, CSS, JavaScript, images, and more.
Each of these requests adds additional overhead and latency, which can lead to slower load times, particularly on slower internet connections.
So, to minimize HTTP requests, you can take several steps, including:
- Combine code files: Combine multiple CSS and JavaScript files into a single file. This reduces the number of requests that the browser needs to make to download all the necessary files.
- Use image sprites: Combine multiple images into a single image, called a sprite, and use CSS to display the individual images. This reduces the number of image requests that need to be made.
![]() An example of an Image Sprite. Image Source
An example of an Image Sprite. Image Source
If you’re using WordPress, there are several plugins that will combine code files for you (see below). You can also, use tools such as Gulp, Grunt, or Webpack or simply do it by hand (copy and pasting code into one master file). Otherwise, you may need to hire a developer.
7. Minimize JavaScript and CSS
Minimizing JavaScript and CSS on a website can significantly speed up a slow website by reducing the size of the files that need to be downloaded. This can be achieved by removing any unused code, combining files, and minifying code.
To minimize JavaScript and CSS, you can take the following steps:
- Remove unused code: One of the easiest ways to minimize JavaScript and CSS is to remove any code that is no longer being used on your website. This can help reduce the size of the files that need to be downloaded.
- Minify code: Minifying HTML, CSS, and JavaScript files can help reduce file sizes and download times by removing unnecessary whitespace, comments, and other non-essential code. This can be achieved using tools such as UglifyJS, YUI Compressor, or Google Closure Compiler.
Once again, if you are using WordPress there are many plugins that will automatically minimize your JavaScript and CSS (see below).
8. Enable Gzip compression
Gzip compression is another technique used to further reduce the size of files sent from a server to a browser. This technique compresses files such as HTML, CSS, and JavaScript files and reduces their file size by up to 70%.
This can significantly improve website performance, as smaller file sizes can be downloaded faster by the browser.
To enable Gzip compression, you can take the following steps:
- Check if Gzip compression is enabled: You can use online tools like GIDZipTest or Gift of Speed to check if your website is already using Gzip compression.
- Enable Gzip compression: If Gzip compression is not enabled, you can enable it by adding a code snippet to your .htaccess file or server configuration file. The code snippet will instruct the web server to compress files before sending them to the browser.
- Test the Gzip compression: Check the size of the files being sent to the browser and confirm that they are smaller due to Gzip compression.
As always, there are plenty of WordPress plugins that will automatically apply Gzip compression to the files on your website (see below).
9. Optimize your database
A website database stores all the data required for the website’s functionality. However, as the database grows, it can become cluttered with unnecessary data, which can slow down website performance.
Optimizing the database involves removing any unnecessary data and indexing tables to improve website performance.
To optimize the website database, you can take the following steps:
- Backup the database: Before making any changes to the website database, make sure to backup the database to avoid any data loss in case of errors or issues.
- Delete unnecessary data: Identify and delete any unnecessary data, such as post revisions, trashed posts, and spam comments. This can be done using a plugin or by executing database queries.
- Rebuild indexes: Rebuild indexes on the database tables to improve search performance. This can be done using a plugin or by executing database queries.
- Optimize database tables: Optimize the database tables to ensure they are using the right storage engine and table structure. This can be done using a plugin or by executing database queries.
- Use caching: Use caching to reduce the number of database queries and improve website performance.
Optimizing a database properly can get quite involved. Here’s a good step-by-step guide on how to get started with this on a MySQL database. But you may well need to get a developer involved on bigger projects.
10. Remove unnecessary plugins
Plugins can offer a wide range of functionalities to a website, but having too many plugins can slow down website performance. Each plugin comes with its own set of files and scripts that need to be loaded, which can increase the website’s loading time.
Removing unnecessary plugins can help improve website performance by reducing the number of files and scripts that need to be loaded.
To remove unnecessary plugins, you can take the following steps:
- Identify unused plugins: Identify plugins that are not being used and are no longer necessary for the website’s functionality.
- Deactivate and delete unused plugins: If you’re using WordPress, this can be done through the dashboard by going to the “Plugins” section and selecting “Deactivate” and then “Delete”. Other CMSs will have similar functionality.
- Evaluate plugin functionality: Determine if there are any plugins that can be replaced with a more lightweight solution, or if there are any plugins that can be combined.
- Regularly review plugins: Regularly check the plugins being used on the website and remove any that are no longer necessary or are affecting website performance.
11. Reduce the number of ads
Too many ads on a webpage can slow down the page load time and make the user experience frustrating. This could be a case of the scripts that insert the ads being inefficient. Or it could be that the ads themselves have not been optimized properly.
Here are some steps you can take to reduce the number of ads on your website:
- Analyze ad performance: Look at the performance data for the ads on your website to determine which ones are not generating significant revenue. Consider removing ads that are not performing well.
- Use a reasonable number of ads on each page: Consider reducing the number of ads on specific pages that have too many, or are already heavy with other content.
- Optimize ad placement: Ads placed above the fold are generally more visible and generate higher click-through rates. However, avoid placing too many ads above the fold, as this can negatively impact the user experience.
- Remove intrusive ads: Remove ads that are intrusive or annoying, such as pop-ups or auto-playing video ads. These types of ads can negatively affect user experience and increase the page load time.
12. Use a lightweight theme or template
A theme or template is the visual design of a website, and it can have a big impact on the website’s speed. Using a lightweight framework can help improve the website’s speed and performance.
A lightweight theme is designed to be minimalistic, with fewer design elements and features that can slow down the website.
Here are some steps you can take to make sure you use a lightweight theme:
- Choose a reputable theme: There are many lightweight themes available, so choose a reputable one that is known for its speed and performance.
- Check the theme’s page speed yourself: Before selecting a theme, check its page speed using tools like Google PageSpeed Insights, GTmetrix or Pingdom. This will give you an idea of the theme’s performance and load times.
- Avoid complex designs: Choose a theme with a simple design that has fewer design elements like animations, parallax scrolling, or large image files. These features can slow down the website and affect the user experience.
- Test the theme: Before deploying the theme to your website, test it to see how it performs on your website. You can use the same tools again to measure the page load time and other performance metrics.
- Regularly update the theme: Regularly update the theme to ensure that it stays optimized for speed and performance. Old or outdated themes can slow down the website and cause other issues.
13. Regularly perform website maintenance
Regular website maintenance can help to prevent technical issues that can slow down your website and improve overall performance.
Here are some steps you can take to perform website maintenance:
- Update your website software: Regularly update your website’s software, including plugins, themes, and the content management system (CMS) that powers your website. These updates can include bug fixes, security patches, and performance improvements.
- Remove unused plugins and themes: Delete any plugins and themes that are not being used on your website. Unused plugins and themes can take up valuable server resources and slow down your website.
- Monitor your website’s performance: Keep track of your website’s performance, including page load times and other key metrics. Use tools like Google Analytics or Pingdom to monitor your website’s performance and identify areas for improvement.
- Clean up your database: Over time, your website’s database can become cluttered with unused data, such as old post revisions and spam comments. On WordPress, use a plugin like WP-Optimize or WP-Sweep to clean up your database and improve website performance.
WordPress Optimization Plugins
If your website is built with WordPress (and since over 41% of the world’s websites are made with WordPress, there’s a good chance it is), then there are a ton of plugins that can help you with each of these steps.
While you will undoubtedly be able to a find a specialist plugin for each of the steps above (eg a plugin in that only minimizes your JavaScript and CSS), this is not usually the most efficient course of action.
Multiple plugins add further weight to your code base, they will all require maintenance, and in many cases they will conflict with each other, causing technical issues on your website.
It’s much better to find one or two plugins that do most of the things to fix a slow website. WP Rocket for example, can take care of almost all the steps on this list! You do have to pay to use it, but it will save you a load of hassle!
We actually have a much more focussed article on how to make WordPress faster, where we talk about this and more!
Conclusion
While each of the above-mentioned categories can be delved into in much greater detail, if you follow these steps, you stand a very good chance of cutting your website load time in half or more, and you most certainly will improve the speed of your site.
Please let me know in the comments section if you have any questions.
The authors
Learn more about us

THE BEHIND THE SCENES OF THIS BLOG
This article has been written and researched following a precise methodology.
Our methodology