Tooltester is supported by readers like yourself. We may earn an affiliate commission when you purchase through our links, which enables us to offer our research for free.
If you have been selling your items through Etsy or another marketplace, or perhaps have a business idea that you are wanting to launch, you may be ready to take your online selling up a level by branching out to Shopify.
Now, if you’ve spoken to any existing owners of Shopify stores, it’s more than likely that you’ve been told how time-consuming and difficult it is to create a Shopify store. But don’t worry, we’re here to help make this process as easy as possible.
We’ve found that by focusing on getting the basics of your eCommerce store set up first, you can use a bit of trial and error to perfect your online selling strategy, leaving the ads, marketing, and branding side of things a bit later.
What do I need to get started?
To get started with your Shopify store, you’ll need the following elements:
- A store/business name: It’s reassuring to know that this can be changed at any time.
- Products to sell online: These may be physical products that you are going to ship or digital products or services
- A payment gateway: Shopify supports a variety of payment gateways, including popular options like PayPal, Stripe, Square, and even its own Shopify Payments. You will need to choose a payment gateway to collect your earnings and set it up in your Shopify account (we go through these steps a little later). Manual payment options such as cash on delivery or bank transfers are also available.
- A domain name: Your domain name is the web address that customers will use to access your online store. You can purchase a domain name through Shopify, another provider, or use a domain name that you already own. (Don’t worry if you don’t have this yet, as you can purchase this later). A free subdomain is also provided from Shopify – it looks something like this: yourstore.myshopify.com
Before you start creating your store, we recommend dedicating some time to ask yourself some general questions about your ecommerce store, so that you can enable all the Shopify features that you need.
Here are some questions you might want to consider:
- Do you want to sell your products through social media channels, such as Facebook, Instagram etc? This is important to consider as you may want to integrate your Shopify store with these channels
- Will your products be sold in person as well as online? If so, you might want to consider opting for Shopify’s integrated point-of-sale system (Shopify POS)
- Which Shopify plan will best suit your business needs? Our full guide on Shopify pricing is available here. Remember you can begin with a free trial period, although it’s limited to 3 days – not very much time at all! (There are other Shopify alternatives whose trial periods are much more generous, in case you want to shop around.)
Step 1 – Creating your Shopify Account
The first step to creating your Shopify store is pretty self-explanatory, all you need to do is head over to the Shopify website and click on “Get Started”. From here, you can choose to set up a Shopify account with one of the following sign-up methods:
- Email (you’ll also need to provide your full name and desired password)
- Apple
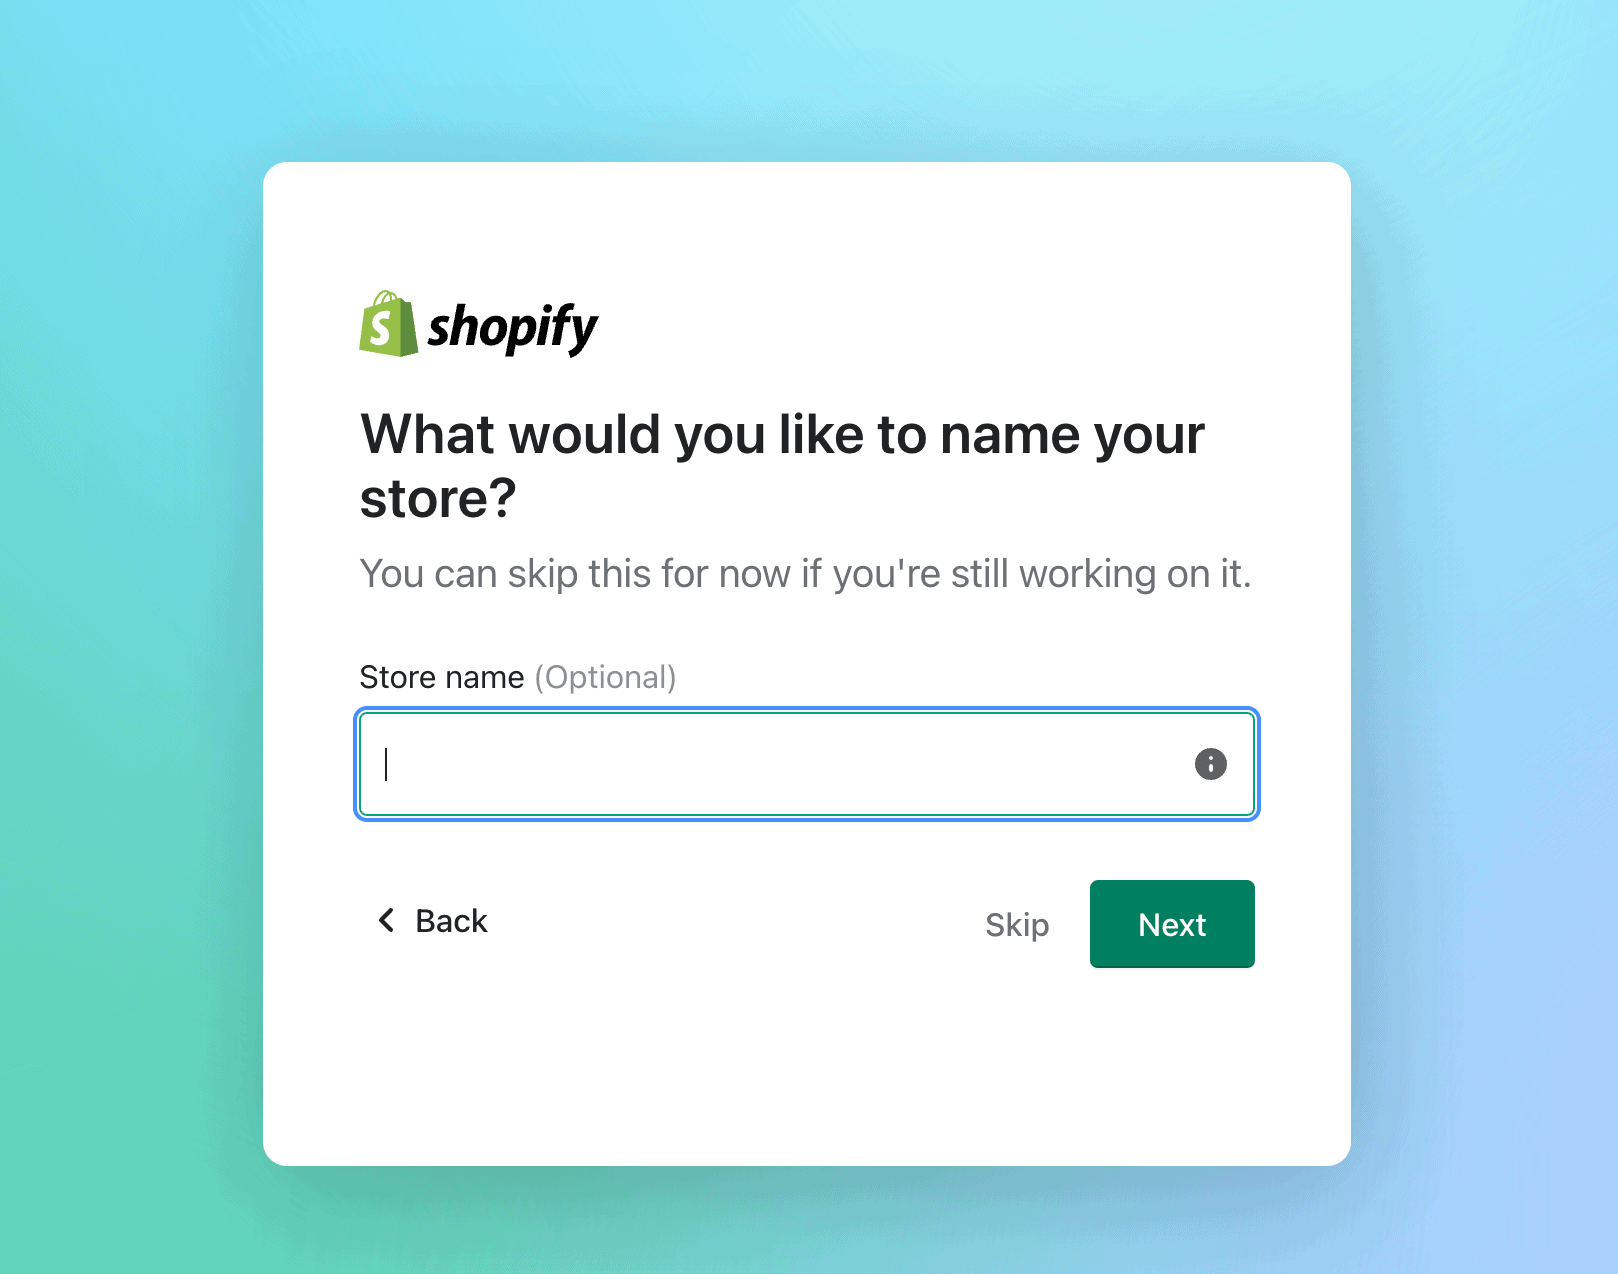
Next up, you’ll be taken to the Shopify store landing page, where you can create your first online store. Once you click on the “Create store” button, you’ll be asked to provide your desired Shopify store name.
Shopify provides a useful tool for creating an eCommerce store name, their Shopify Business Name Generator. You can add a keyword or two that you’d like to have in your eCommerce store name, and the tool will provide you recommendations. Then you can simply scroll through the options and select the store name that best fits your eCommerce business.
Make sure you choose a catchy name that aligns with your business, this will be part of your online identity so make sure you think this part through carefully.
Step 2: Provide Your Business information
Once you have submitted your personal information, Shopify will ask for more information about your business. Simply fill in the required information:
- your business revenue (don’t worry if you’re not making any yet as you can specify this)
- your goals for using Shopify
- the industry you are operating within
- your billing details and address
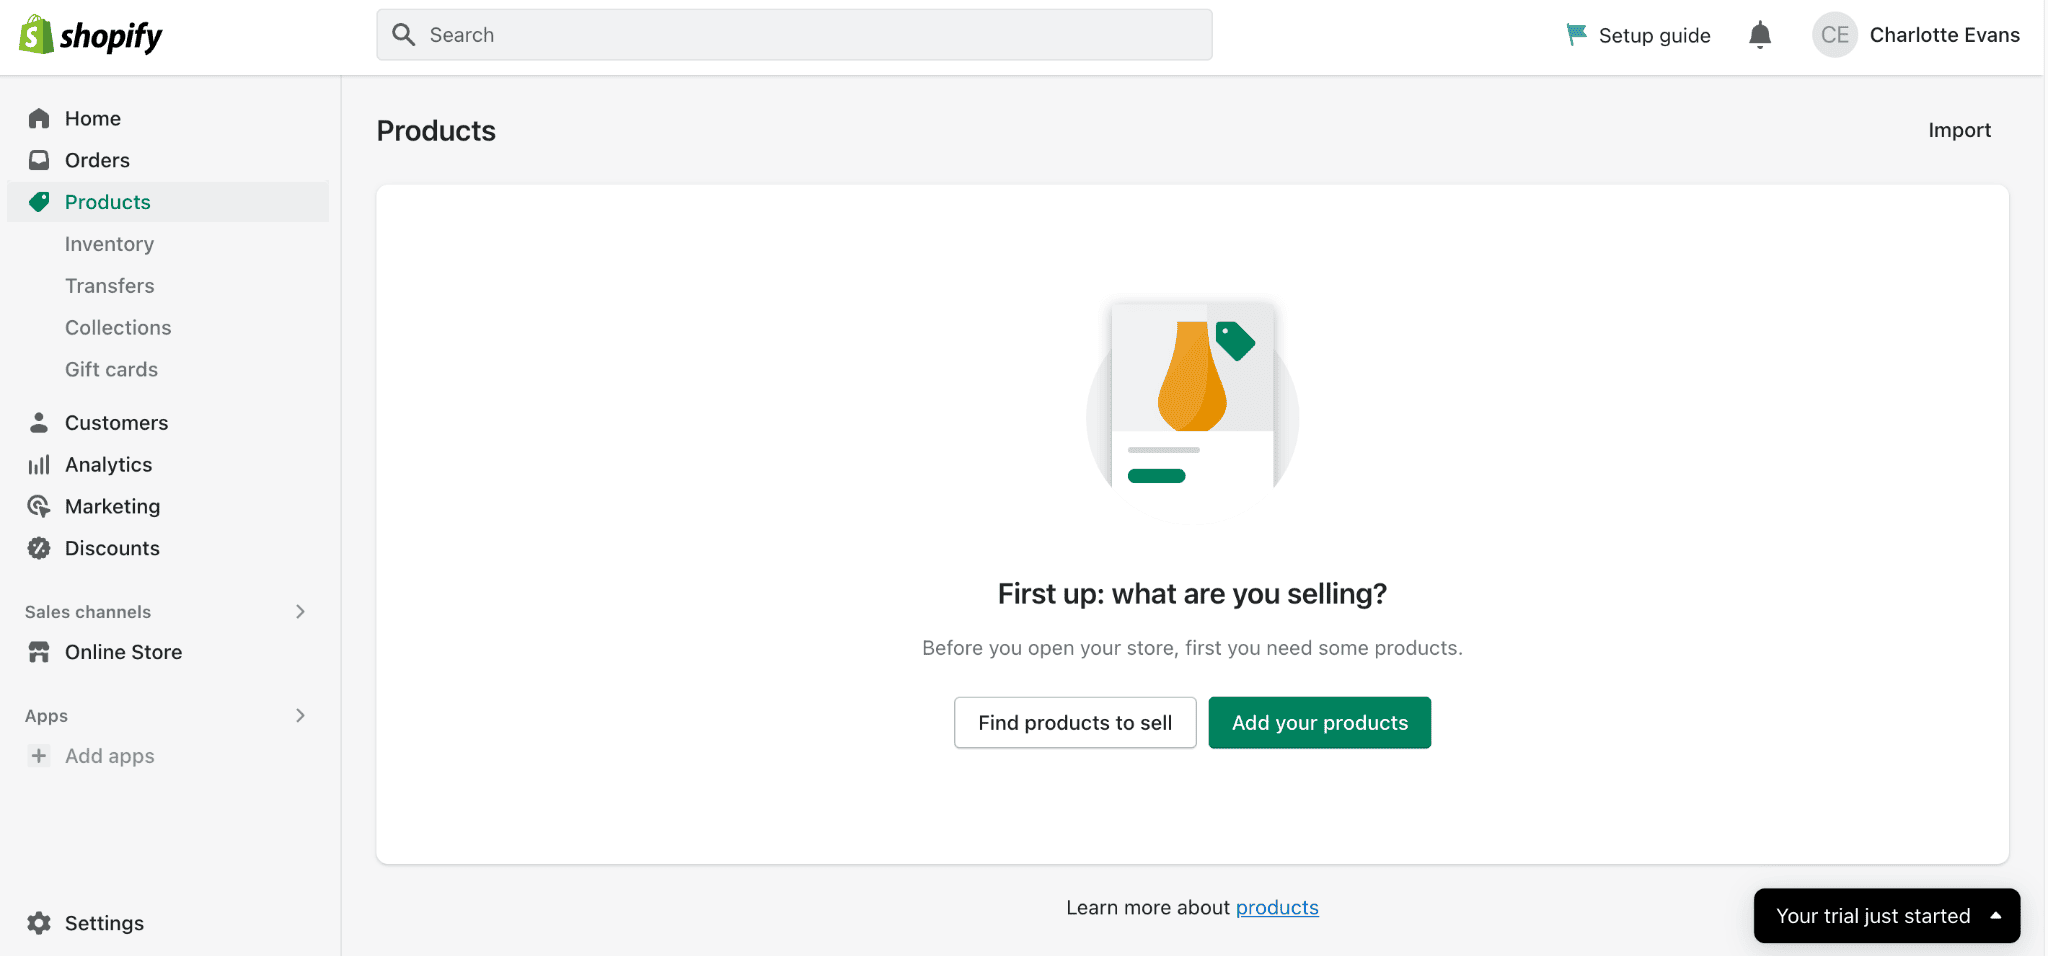
Once you have filled in all of these details, you will be redirected to your very own Shopify admin page. You’ll be able to start adding customizing your page and adding products – and we’ll show you exactly how to do that.
Step 3: Add your physical products
Shopify’s admin page contains everything you need to get your online store up and running. Now you can go ahead and add your items. In addition to physical items, you can also add services, files, and any items that might be available for download.
- Head over to the Products page, and click ‘Add product’.
- Next, you’ll be asked to fill out the following information:
- Product Title
- Product Descriptions: Here you can add text, then change the headings, color, font style, and size. In this section, you have the ability to link your text to another page or website, add images, and even add videos and tables.
- Product organization: In this section, you’ll be asked to categorize your products. There are a lot of different categories to choose from such as Furniture, Hardware, Health, Beauty, etc.
- Define the product type: For example, chair, shirt, etc,
- Add Vendor information: This is where you can define the manufacturer, wholesaler, or another vendor for the product.
- Collection: Here you can add different collections to group your products together. This helps to keep your online store organized.
- Product images: You can upload your own product photos, or you can upload your product images from a specific URL.
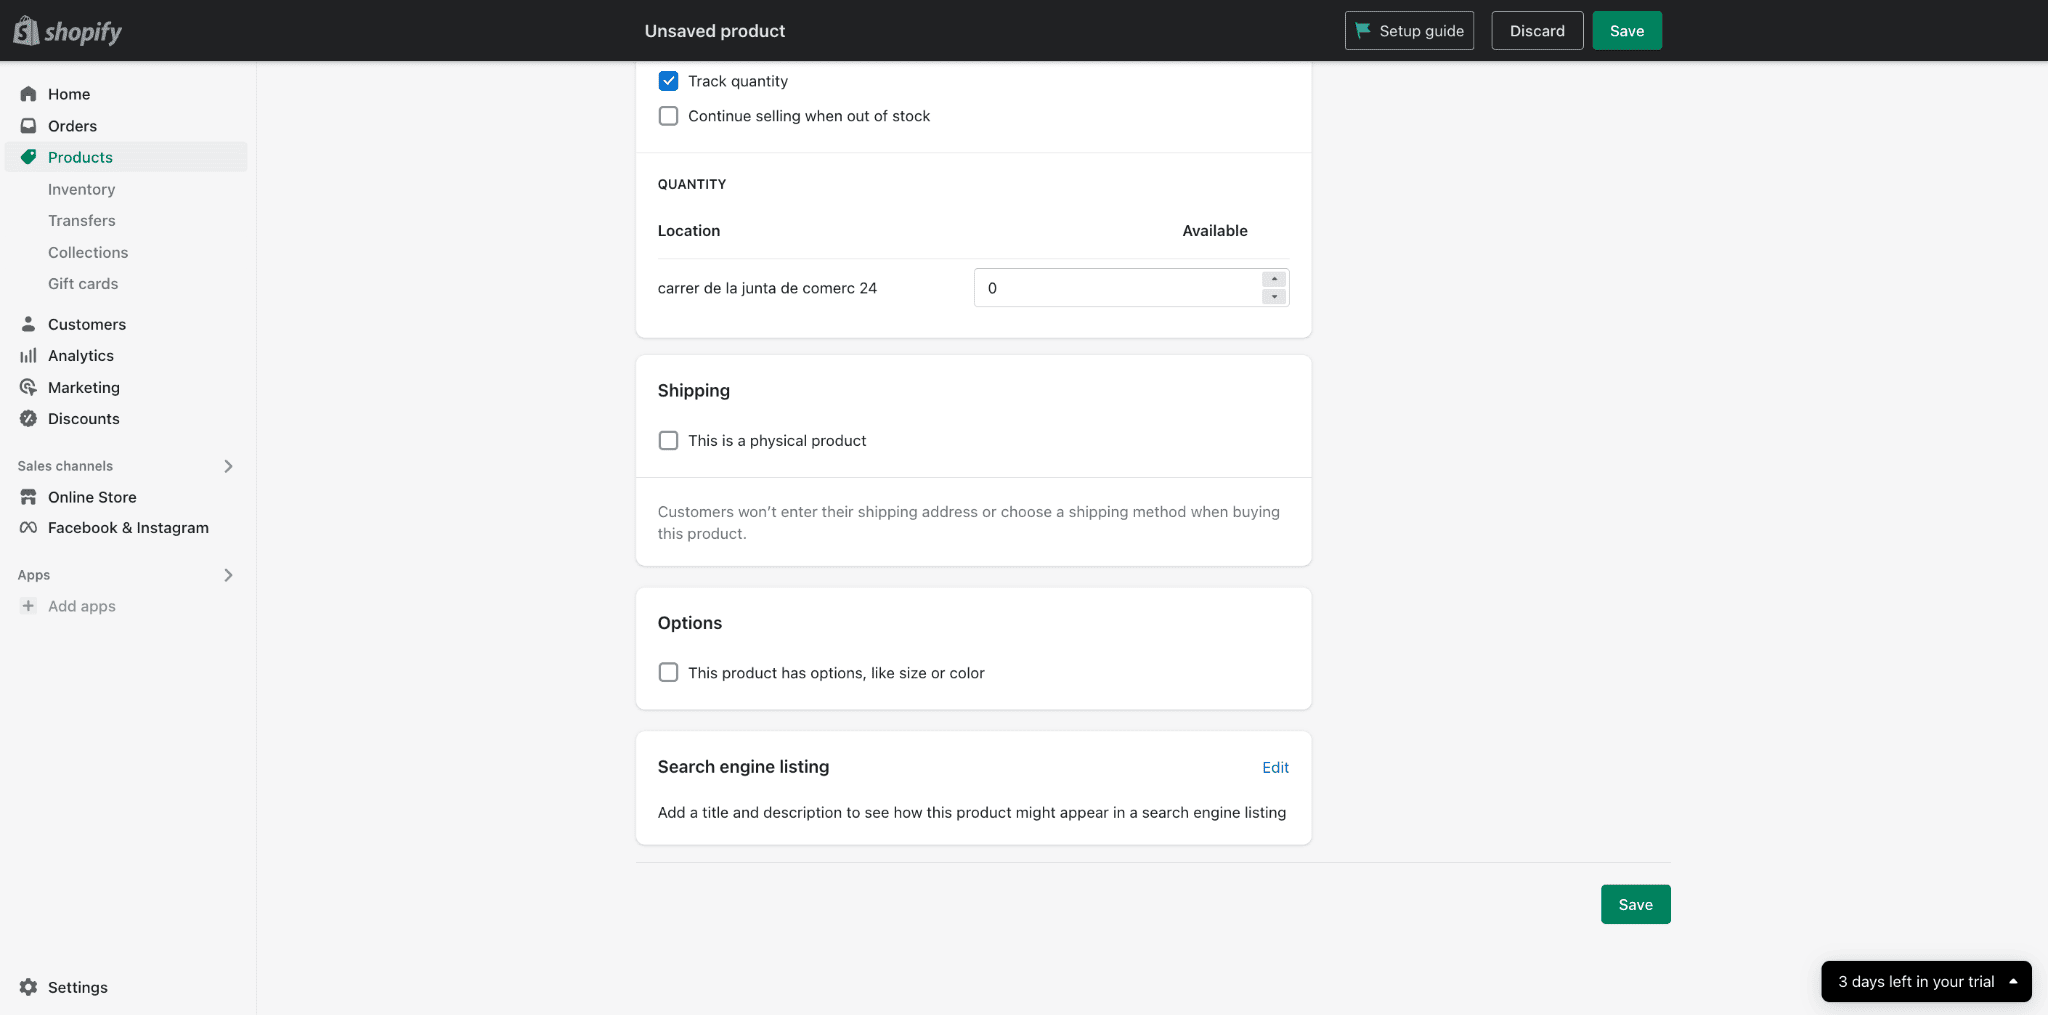
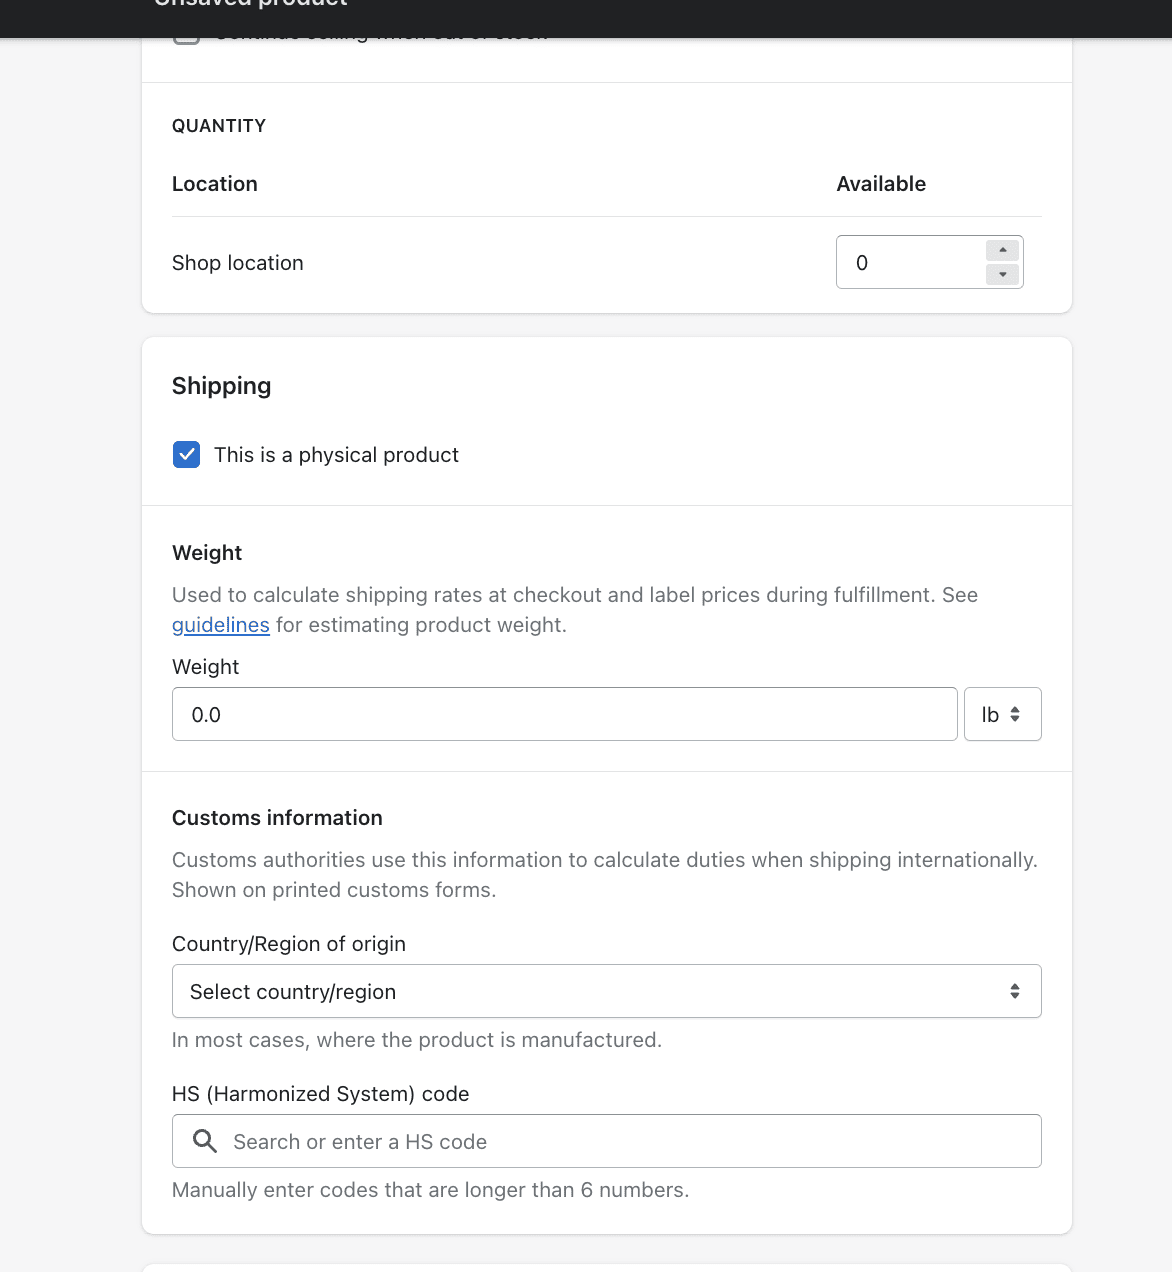
- Inventory: This section includes Stock Keeping Units (SKUs) and barcodes (ISBN, UPC, GTIN, etc). Here you can track the stock you have remaining, you can also choose to continue selling the stock when you run out of items.
- Shipping: Here you’ll be asked to determine the weight of the product for physical products. Shopify provides some helpful guidelines for estimating product weight and shipping costs.
- Customs information: This information is required for calculating duties when shipping products internationally. This will be shown on customs forms. You’ll be asked to select the Country/Region of Origin, which is often where the product was made, and HS (Harmonized System) code.
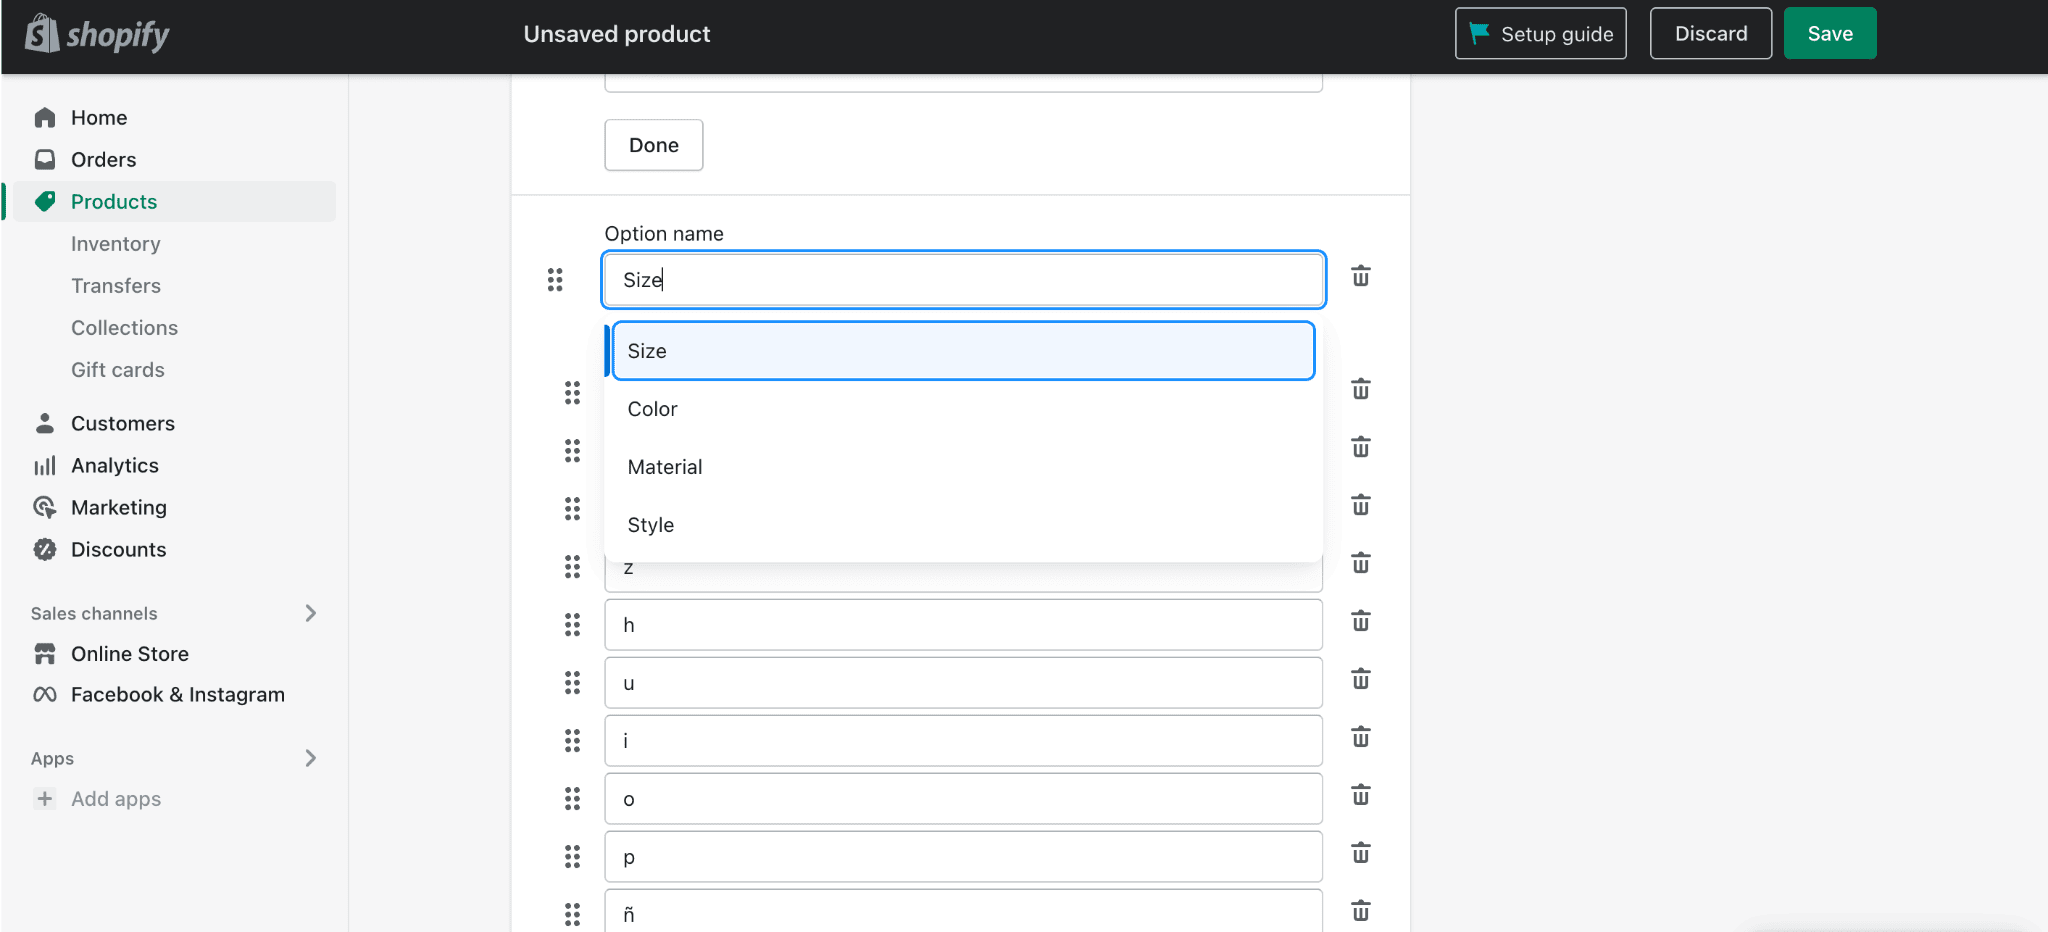
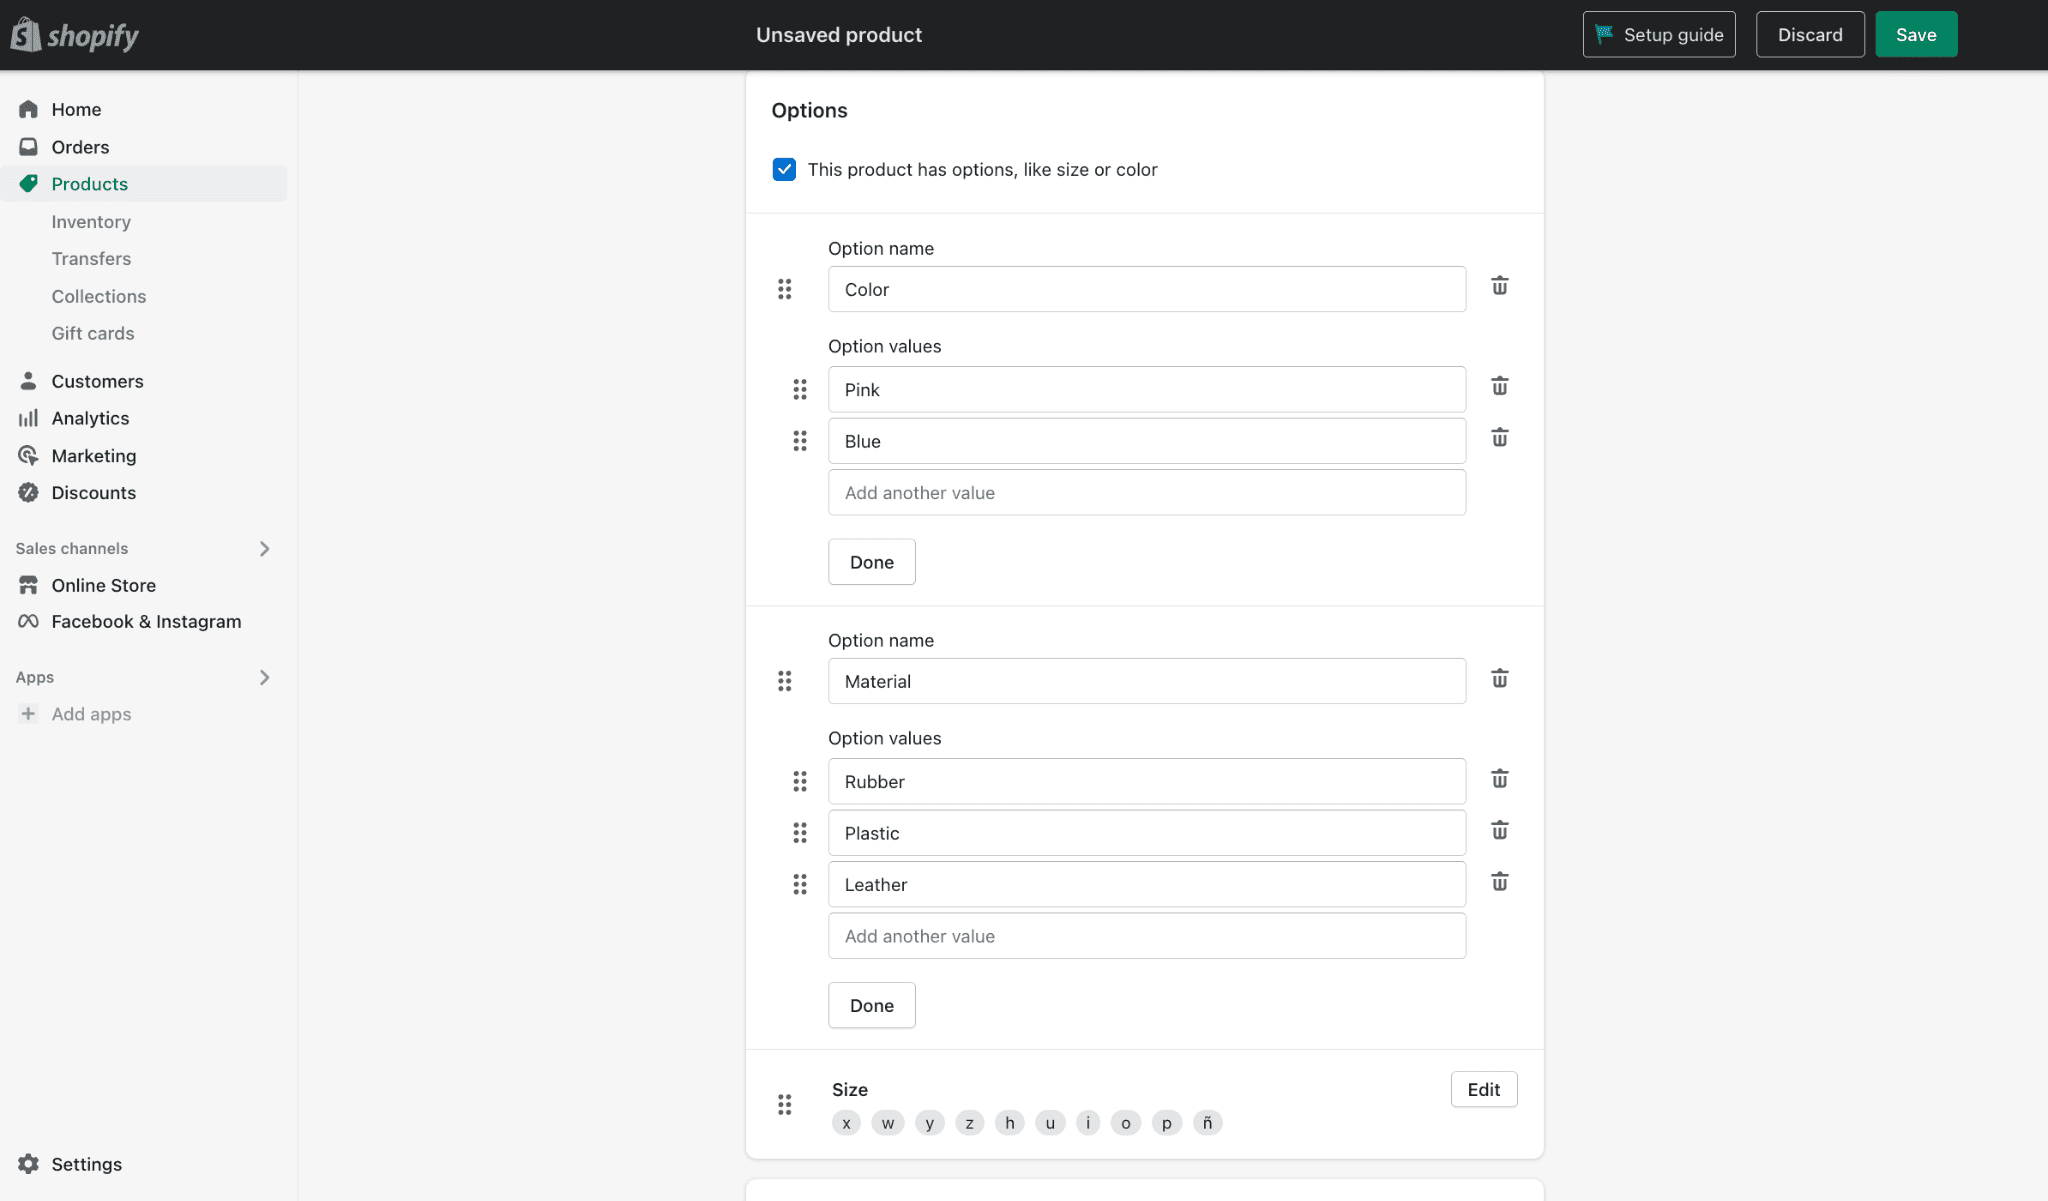
- Options: This is where you can add different options for your products; you can choose from Size, Color, Material, and Style. You can add up to 3 different options and within these options, you can add a variety of option values.
- Search Engine Listing: You have the ability to add some Search Engine Optimization to your product listing here. This involves adding a page title, with the keywords, meta description, and URL handle. You can also view how this will look on search engines.

If you are looking to start selling digital products or files, we will get into that process a bit further down in the article.
Once you’ve added all this information, simply click ‘Save’ and your products will be (almost!) ready to be sold online.
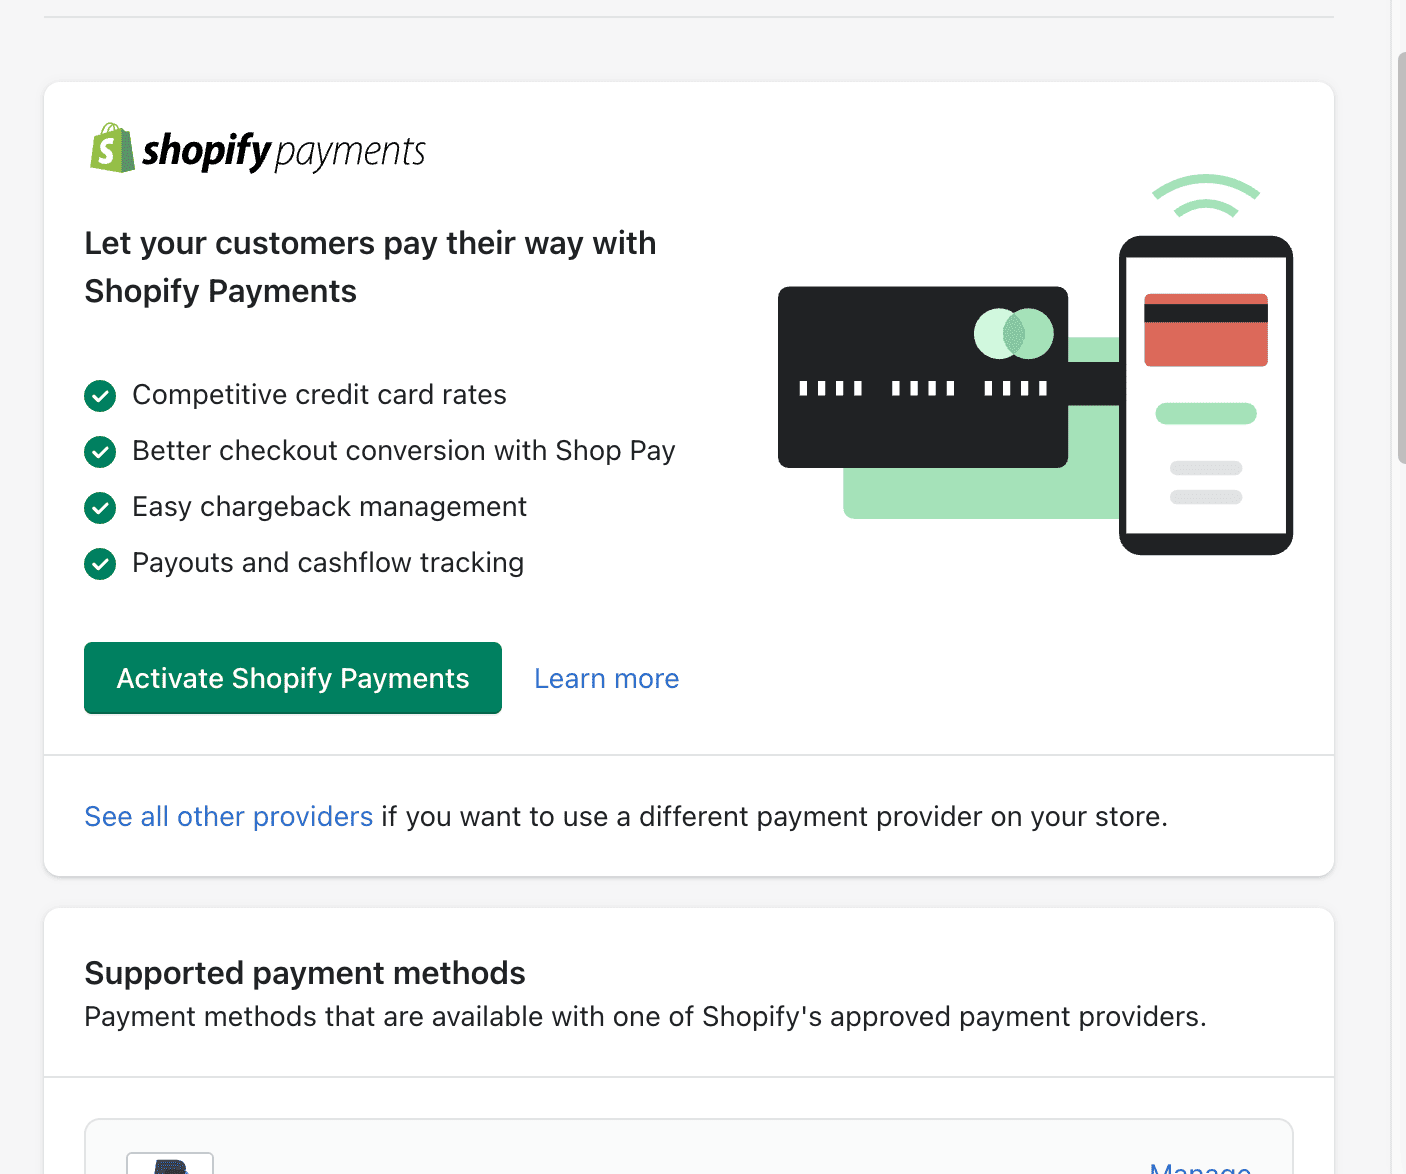
Step 4: Set Up Payments
Shopify has a variety of payment gateways available for you to use in order to accept payments online. Go to Settings > Payments to set up your payment provider.
Shopify Payments
We recommend using Shopify Payments, Shopify’s own payment gateway (powered by Stripe). It’s easy to set up and it provides your customers with a variety of additional payment options, such as the following:
- Credit cards
- Google Pay
- Shopify Pay, and more.
The biggest advantage, though, is that with Shopify Payments, you don’t pay any sales fees. (Without Shopify Payments, Shopify’s transaction fees vary from between 2.4% + 30c per transaction, to 2.9% + 30c.)
To sign up for Shopify Payments, you’ll need to add the following information:
- your personal details
- business and product information
- your bank account number
Before you set up Shopify payments, you just need to ensure that your ecommerce business is operating in one of the supported countries.
Otherwise, you can also choose from over 100 third-party payment providers here or offer your customers additional payment options, such as PayPal.
Shop Pay
Another payment option that you may consider is Shop Pay. According to Shopify, this is the highest converting and fastest checkout process but you do need Shopify Payments to use it. This lets customers save their email addresses, credit cards, billing, and shipping information for a quicker checkout process (payment details can then be auto-filled whenever they shop in any store that uses Shop Pay).
With Shop Pay customers will also have the ability to pay for their entire order at the checkout or pay in installments for any orders that are a minimum payment of $50 USD and a maximum of $17,500 USD.
Paypal
Another straightforward payment option is PayPal. If you are not already a Paypal user, it’s very easy to set up an account.
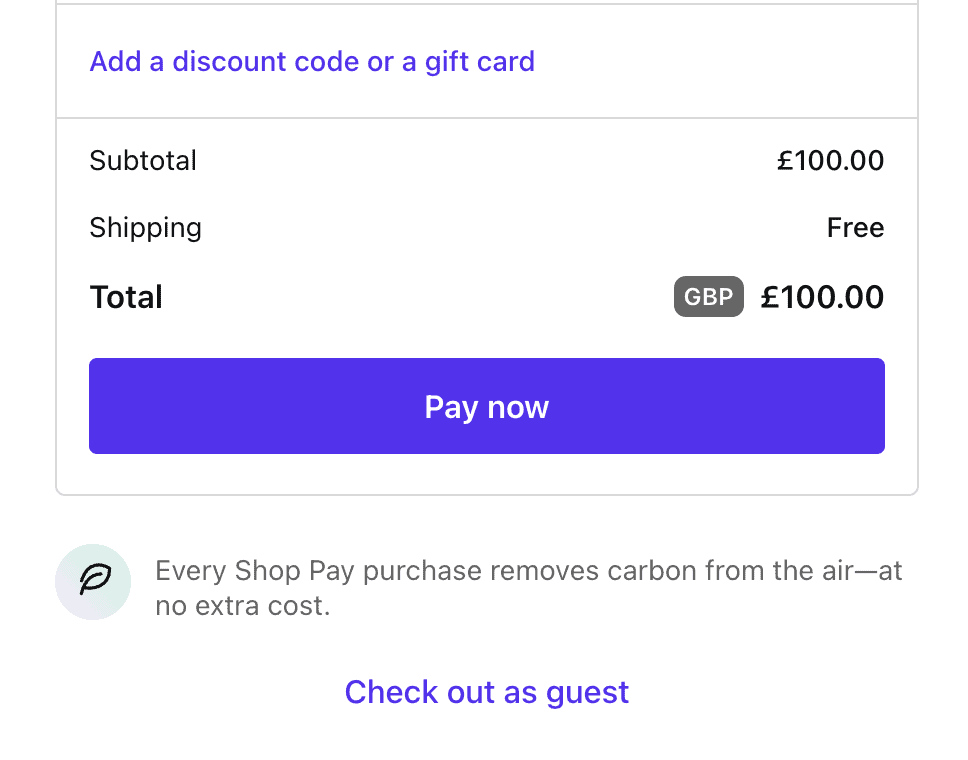
Setting up your Shopify Checkout
Shopify lets you easily modify your checkout settings. Within the Checkout settings tab, you have the ability to customize the style of your checkout. You can upload a logo, change the font and theme colors, and more.
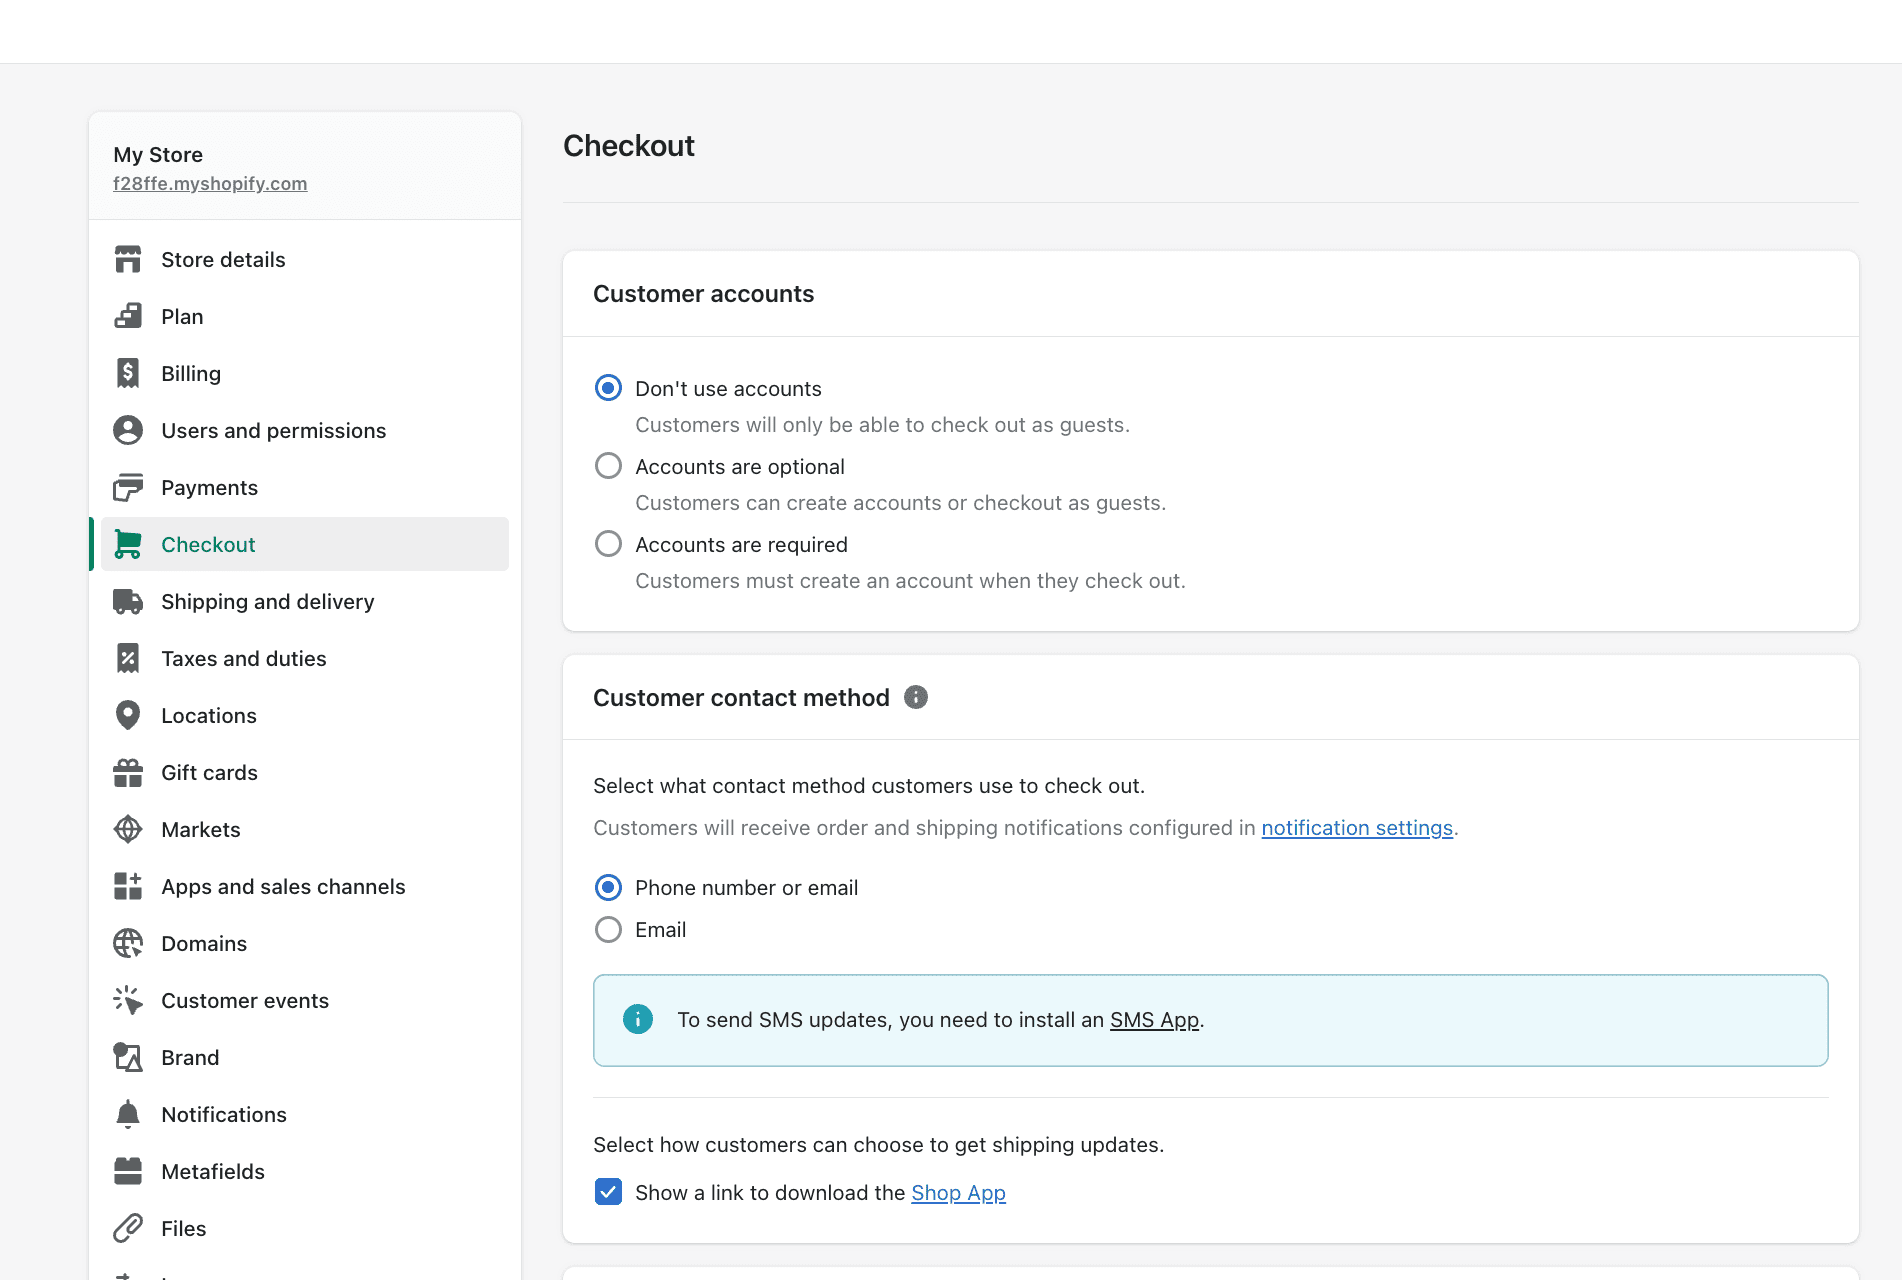
You can also choose whether to make it compulsory for new customers to create an account for your online store during their checkout process. The three customer account options available are:
- Accounts are disabled – Customers can checkout as a guest
- Accounts are required – Customers can only checkout if they sign up for an account
- Accounts are optional – Customers can checkout with either of the above options
Step 5: Shipping and Delivery
Determining your shipping and delivery rates/time is a crucial part of setting up your online store. All you need to do is head to Settings > Shipping and Delivery and from here you can add your different shipping rates. If you decide to add weight-based or price-based conditions, you’ll need to click on “add conditions” and then select whether you want to base the conditions on “order weight” or “order price”. From here you can enter the minimum and maximum values for these conditions.
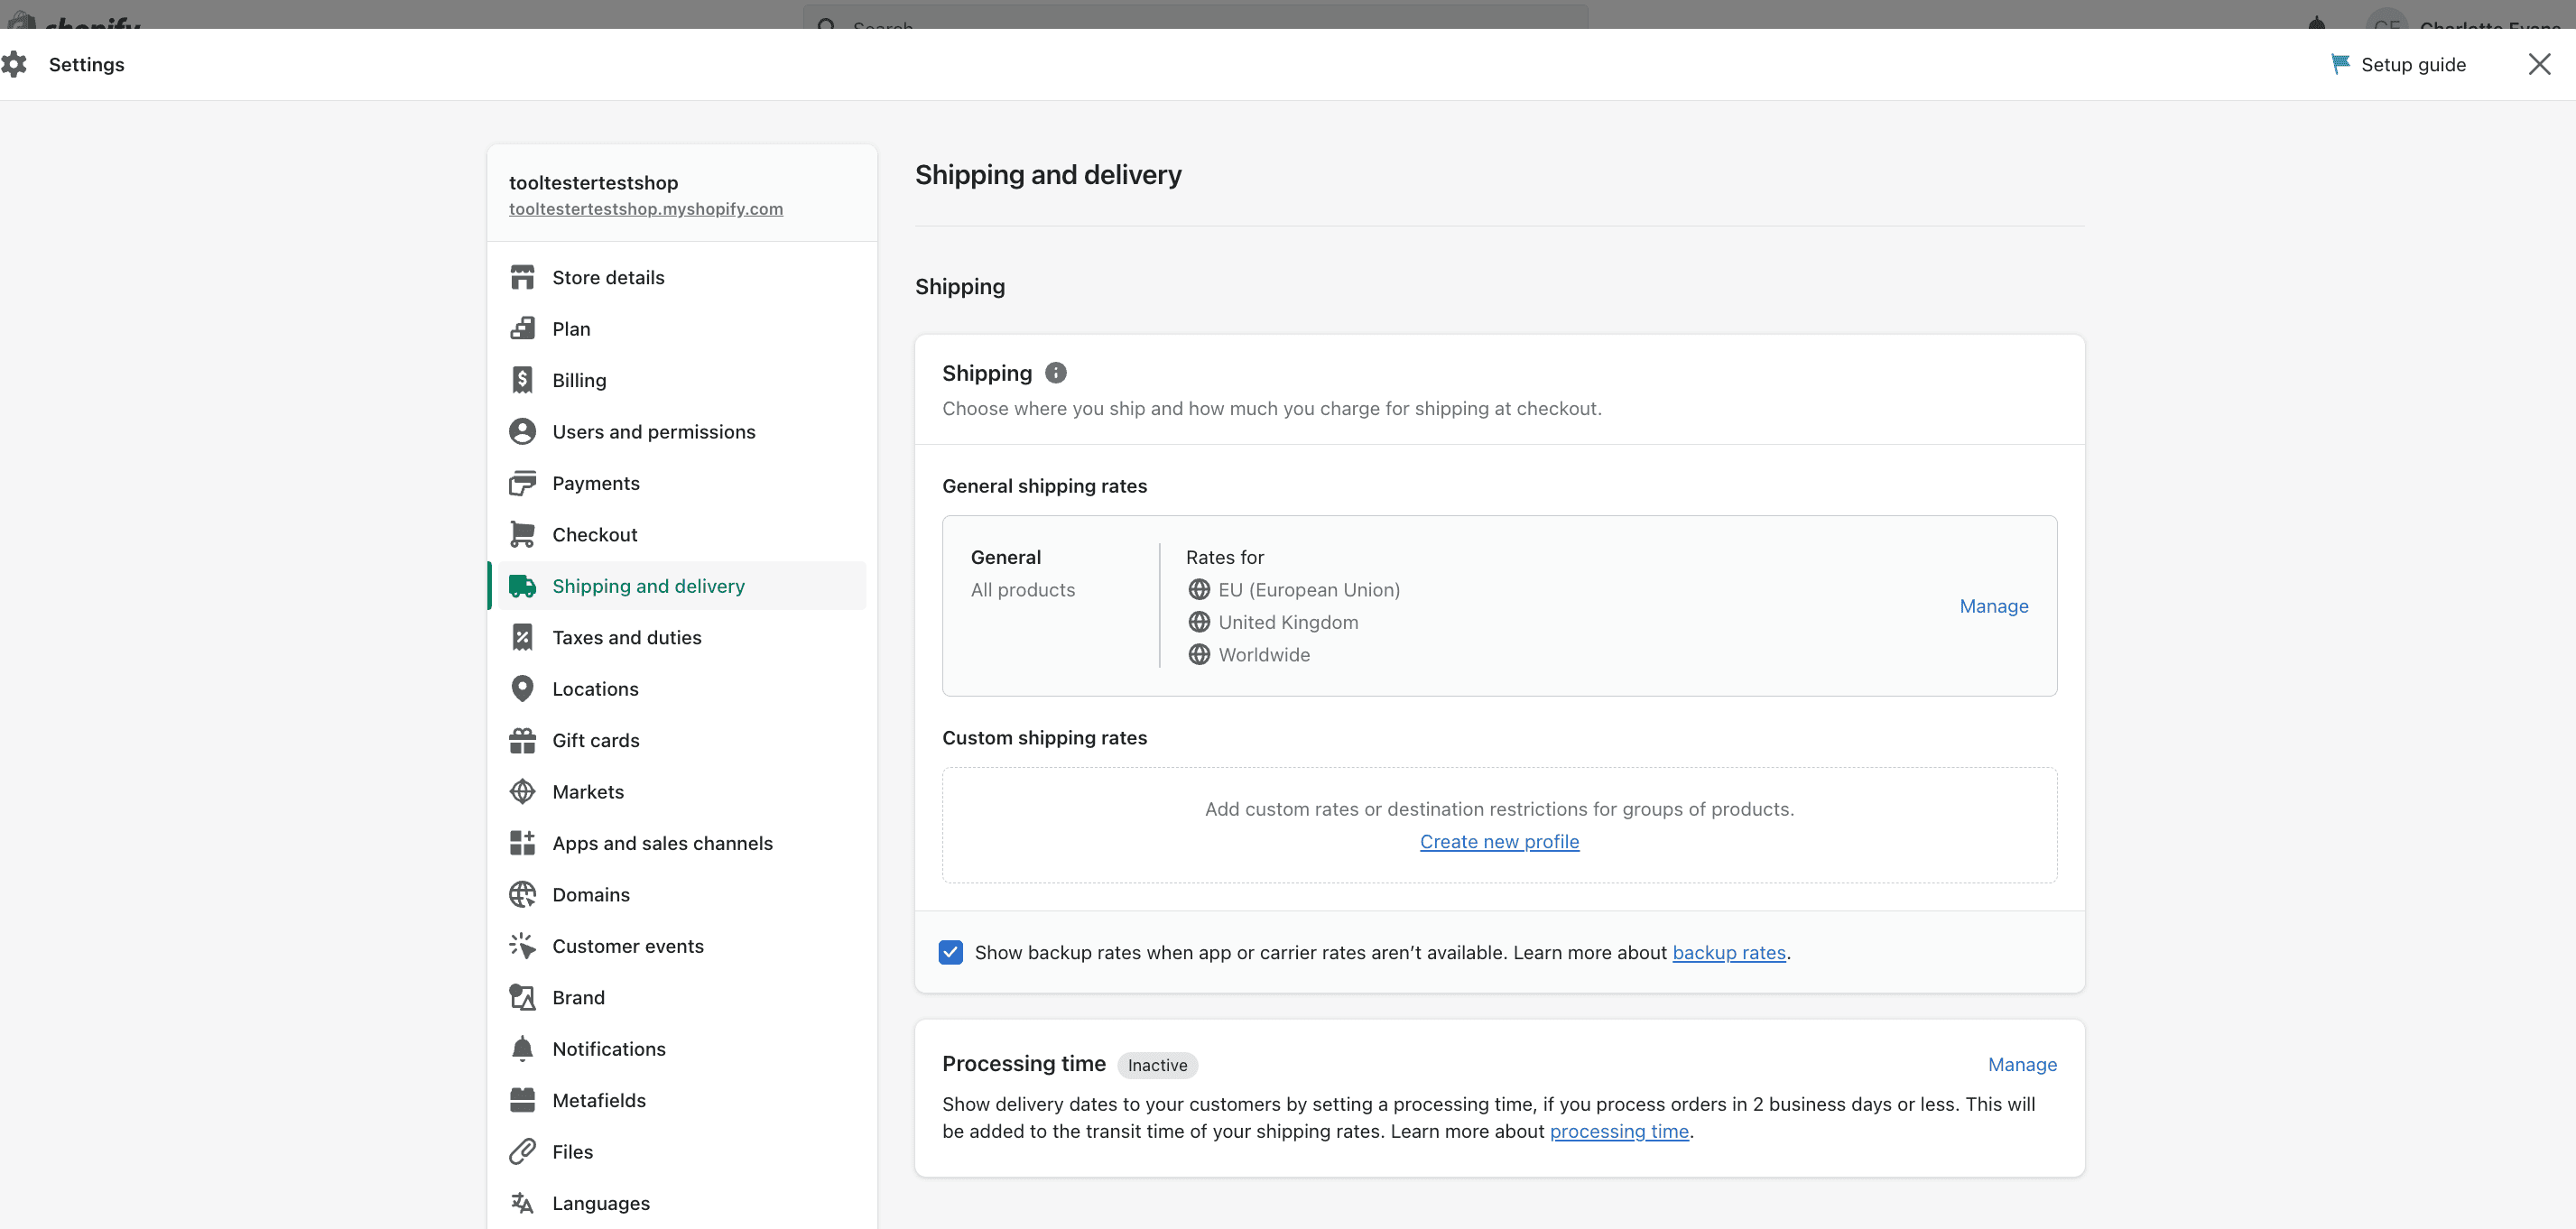
We recommend adding Free shipping as your default shipping rate. By selecting this method, you make the process of managing your shipping rates a lot easier and more appealing to your customers. With this default free shipping rate, you can also add custom shipping rates for certain products or orders over certain values/weights.
Step 6: Set up Product Taxes
A very important step is entering your tax information to ensure that you are collecting the correct sales tax from your customers. It may be a good idea to involve a tax professional for this part to ensure that you are charging the correct amount of tax for each product.
First go to Settings, Taxes, and then set up your regions. Here you’ll have the ability to override any settings and make changes to specific products. You’ll be asked to add your tax information and number here too.
Remember: Shopify doesn’t remit or file your sales taxes for you.
In the United States, the sales tax that you should charge for your products depends on several factors:
- The location that your product is shipped from
- The location that your product is shipped to
- Where you’re registered to collect tax
- Item taxability
- Buyer exemptions
To make things easier, Shopify does allow you to set up registration-based taxes and location-based taxes, although for now this is only available in a few countries. The Avalara AvaTax software for automated tax calculations is also available to Shopify Plus users.
It’s also worth noting that customers in the EU need to pay VAT on digital goods at the rate specified by their country. This is applied based on the country that the customer resides within, rather than where the seller is located.
Once you’ve made sure that your tax information is applied correctly, click ‘Save’ and you’ll be ready to start selling your products online.
Step 7. Selling a Digital Service or Product on Shopify
If it’s a digital service or product you are looking to sell, you can also do this through Shopify. And the process is pretty much the same. The only difference is that you untick “This is a physical product” and therefore any shipping rates and information will be removed from the listing.
There are two main ways to sell digital products on Shopify:
- One-off digital downloads: This is in the form of a downloadable file that the customer will be directed to after checking out.
- Membership subscriptions: You can sell monthly subscriptions through the Shopify app for recurring digital products (e.g. a monthly magazine). With this option, your customers can choose whether to signup for a monthly membership or instead pay upfront for the whole year.
Shopify Digital Downloads App
If you are looking to start selling digital downloads and products online, one app that may be quite useful for you is Shopify’s own Digital Downloads app. Within the app, you can upload digital files to your online store. The process is extremely easy, all you need to do is head to Products > All Products and then simply add the digital download or product that you wish to start selling online.
Step 8. Customize your store design with Shopify Themes
One of the great things about Shopify is that you can create a beautiful online store without the need for a developer and zero knowledge of coding. If you are on a bit of a budget, Shopify offers a small selection of free themes to choose from that are easily customizable. If you don’t mind paying for a Shopify theme, there are plenty more templates on offer.
Head to the Shopify theme store, and you’ll find a good selection of themes categorized as the following:
- Large catalogs
- Small catalogs
- Free themes
- Selling in Person
- Selling internationally
- Minimalist style
- Trending this week
- New theme releases
To change the theme, follow these steps:
Step 1: Go to the Themes section
On the Shopify admin page, look at the menu on the left-hand side of the admin page and click on the Online Store button, then you’ll be directed to Shopify Themes page.
Step 2: Browse Shopify Themes
On the main Shopify themes page, scroll down to the bottom of the page until you see Free Themes and the Shopify Theme Store page.
If you are looking for a free theme, you can click on the Free themes button at the bottom. Otherwise, you can visit the Shopify Theme Store for professional, paid Shopify themes.
Step 3: Choose the theme you like
Once you have selected the Shopify theme that you like, you can read about its features and see what’s included within this theme. You can click “Add” to add it to your online store theme library.
Step 4: Publish the theme
Finally, once the theme has been added to your Shopify admin, you can click “Customize” to edit the theme to suit your brand identity. The Shopify theme editor includes everything that you need to make sure you have chosen the right theme for your brand, including a theme preview.

Step 9. Setting up your Product Collections
To keep your online store looking presentable to your customers you may decide to create product collections. This will help make your store more user-friendly for your customers. You may decide to organize them into some of the following categories:
- Reduced/sale items
- Seasonal products
- Categories such as shoes, coats, etc.
Follow the following steps to organize your products into collections:
- Go to the Collections page and click “create collection”
- From here you’ll be asked to enter a title and description for the collection.
- Then you can look under the Sales Channels tab, here you can select whether you want to make your collections available on other sales channels such as Shopify POS, Facebook Messenger, Amazon, and more.
- Next, you can choose whether your products will be added to the collection manually or automatically. Remember that you won’t be able to go back and change this later.
- If you choose to go with Automated collections, you’ll need to define the criteria within the conditions tab. The criteria can be one of the following:
- Product Title
- Product Type
- Tag
- Product Price
- Inventory Stock
Alternatively, if you go with the manual collection you can select the products you want to add and click save. It’s also important to note that you can also add the same product to various collections, you are not limited to just one.
Step 10. Adding extra information to your Shopify store
To keep your online shoppers informed, you may want to add company details to your Shopify store by adding an About Us page or similar. This is especially worth doing for any information that isn’t likely to change such as your operating hours and customer contact information.
Follow these steps to add a page to your Shopify store:
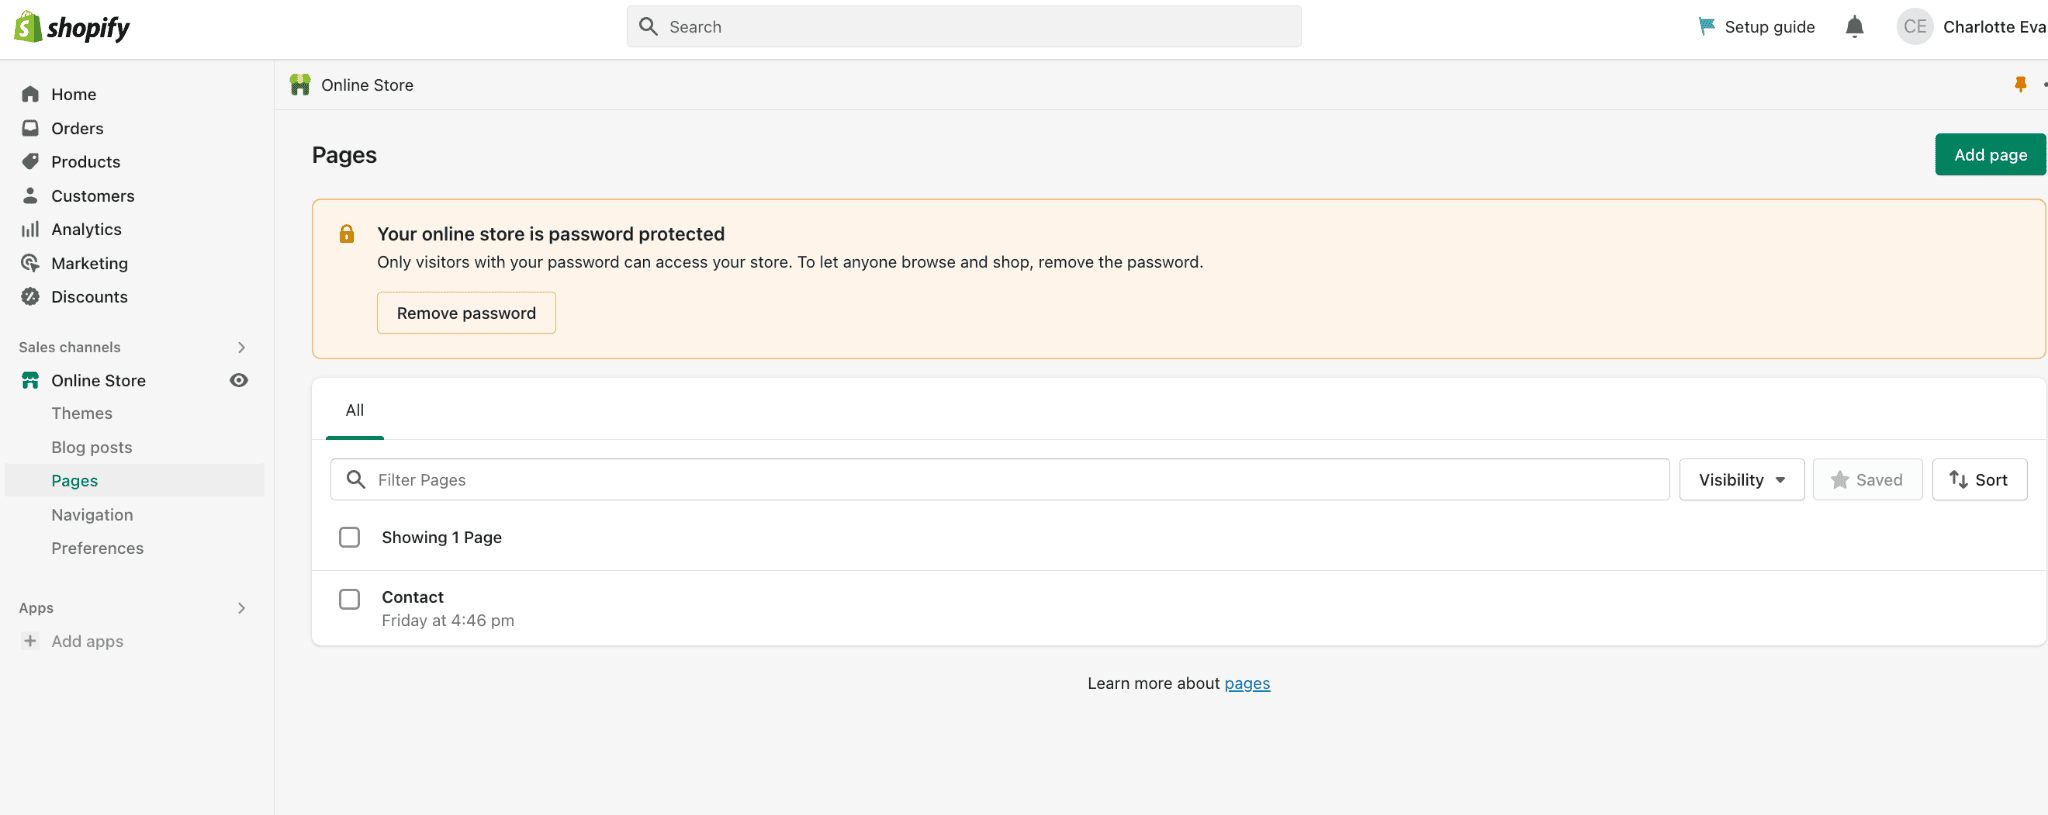
- Head to the Shopify admin page, then select ‘Online Store’ and then ‘Pages’
- Next click ‘Add a page’, and you’ll be presented with a new webpage editor.
- Within the editor, you will be able to add your page title and your text within the existing content boxes.
- Try to be clear and descriptive when choosing your webpage title as this will be displayed within the title bar of your customer’s browsers, and will also be shown as a search engine result.
- Once you click Save, your webpage will be published, but you’ll then need to add it to your menu. In order to hide this page, select “Hidden” within the visibility field. Alternatively, you can schedule your page to be published on a different date.
Step 11. Creating your Main Menu
Your Shopify main menu appears on every page of your Shopify store and is usually displayed across the header, or as a list of items in the sidebar. It’s more than likely that your online store visitors will use this main menu to find information about your store and browse other pages on your site. To set up your main menu:
- Head over to open your Navigation section within the admin section
- Next select edit ‘Main Menu’ card
- Then list all your collections there.
Check out our Shopify Review video:

How to create a Shopify store: Conclusion
Hooray! If you followed our steps, you should have set up your very own Shopify store. As we mentioned, these steps will help you to conquer the initial set up of your store. The next part is about working on your online store to drive sales and improve your overall customer experience.
To help your store become a successful ecommerce store, you will need to focus on developing a solid Shopify marketing strategy, which can be done through Shopify’s built-in marketing tools, as well as third-party app integrations.
Begin by dedicating some time each week to improving your Shopify store so that you can find new ways to boost your product sales, and continue learning how to grow your ecommerce business. This may involve learning new marketing skills such as search engine optimization (SEO), paid ads and marketing, content marketing, and more.
Finally, to make sure that the work you are doing is helping to bring visitors and drive sales to your online store, track your performance through the analytics section, where you can access both a live view of visitors on your site, and comprehensive reports.
Luckily for you, there are tons of free resources and guides within the Shopify help center to help you along the way. And of course, if you have any questions, feel free to ask us in the comments section below!
The authors
Learn more about us

We keep our content up to date
12th Jan 2023 - Added Shopify video review
THE BEHIND THE SCENES OF THIS BLOG
This article has been written and researched following a precise methodology.
Our methodology